Showing posts with label die cutting. Show all posts

GINA K. DESIGNS AND THERMOWEB - Penguin Pals Kit

Tuesday, October 17, 2023

Hello everyone!

I am here with Gina K. Designs featuring the newly released "Penguin Pals Kit".  This kit is so adorable, it comes with a stamp set, a stencil and dies to create the penguin, and many die to help you create your project.  This is a one-time deal, once the kit is sold out it will not be available, so get it while you can.  The set is only available on ThermOWeb's website.  

I have created two cards for your inspiration:

Donna Idlet, Gina K. Designs, Thermoweb,  Penguin Pals Kit, ink blending, penguins, fancy foil,  Deco Foil Flock,  die cutting, Duo gel,

My first card is an A2 card (4 1/4 x 5 1/2), I used the GKD Master Layouts 1 to die cut the layers.  

I ink blended the background using GKD inks (Wild Lilac, with a little black on the edges) and used some white pigment ink to splatter the background.  

I die cut the snow hills using GKD Master Layouts 6.  I ink blended the hills using GKD ink Sea Glass.

I die cut the cut penguins using Deco Flock in black (for the body), white (for the body), orange glow (for the feet, beak, scarf and earmuff), think pink (for the scarf and bow), and purple punch (scarf and earmuff).  

The tree I die cut using GKD Fancy Foil Glittering Green using solid black toner paper.

I stamped the sentiment using the stamp set, which I heat embossed with clear embossing powder.

Assembled the card.

Donna Idlet, Gina K. Designs, Thermoweb,  Penguin Pals Kit, ink blending, penguins, fancy foil,  Deco Foil Flock,  die cutting, Duo gel,

My next card, I created an A2 shaker card. I cut the top panel at 4 x 5 1/4, I die cut the circle using GKD Circle Shadow Shakers die cuts.  

I inked blended the layer with GKD Sea Glass and Navy ink.  

I then die cut a circle in the center.  I  stenciled the background using the snowflake stencil from the kit with the Deco Foil Transfer Duo Gel.  After the Transfer Duo Gel dried, I added Fancy Foil Brilliant Blue foil to the circle and ran it through my minc.  I have the Fuse Foiling System on order!  I can't wait to get it Thursday!

I added some acetate in the back of the top layer, added GKD Double-sided Adhesive Foam Shaker Strips to the back layer of the panel, added some GKD Mini Snowflakes and attached the foiled circle to the panel, and finished the card off by adding the stitched circle die to the card.

I made a snowman from the body of the penguin and assembled the penguin.  I added these to the card panel.  

Stamped the sentiment and finished the card off by adding some snowflakes.   


Thank you so much for stopping by, I hope you have been inspired and will join the hop.


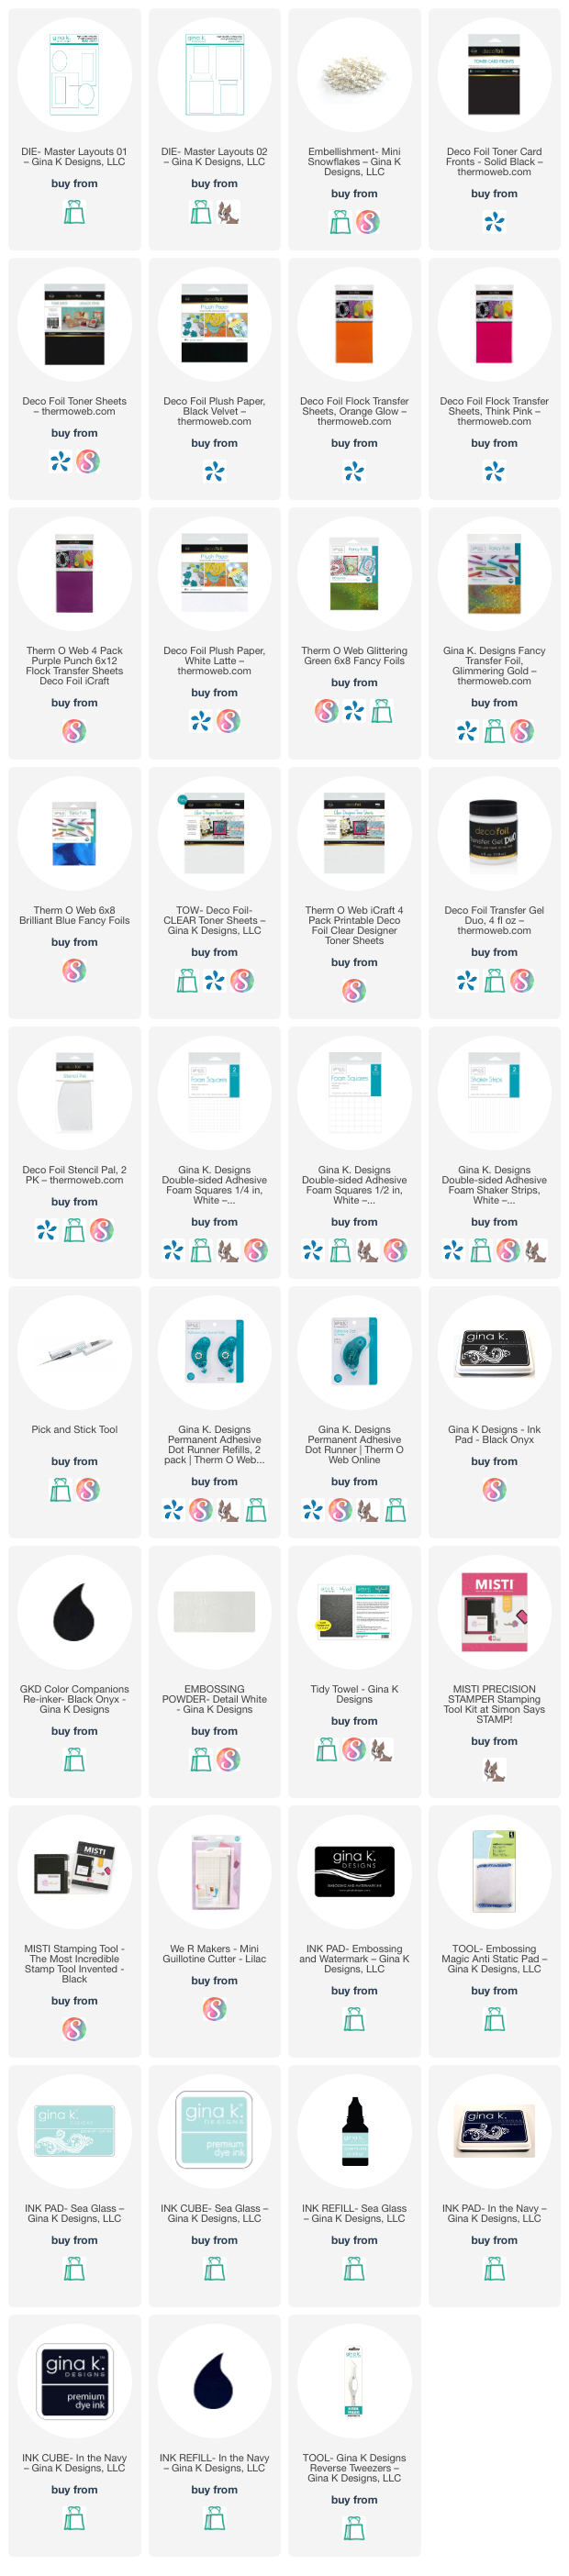
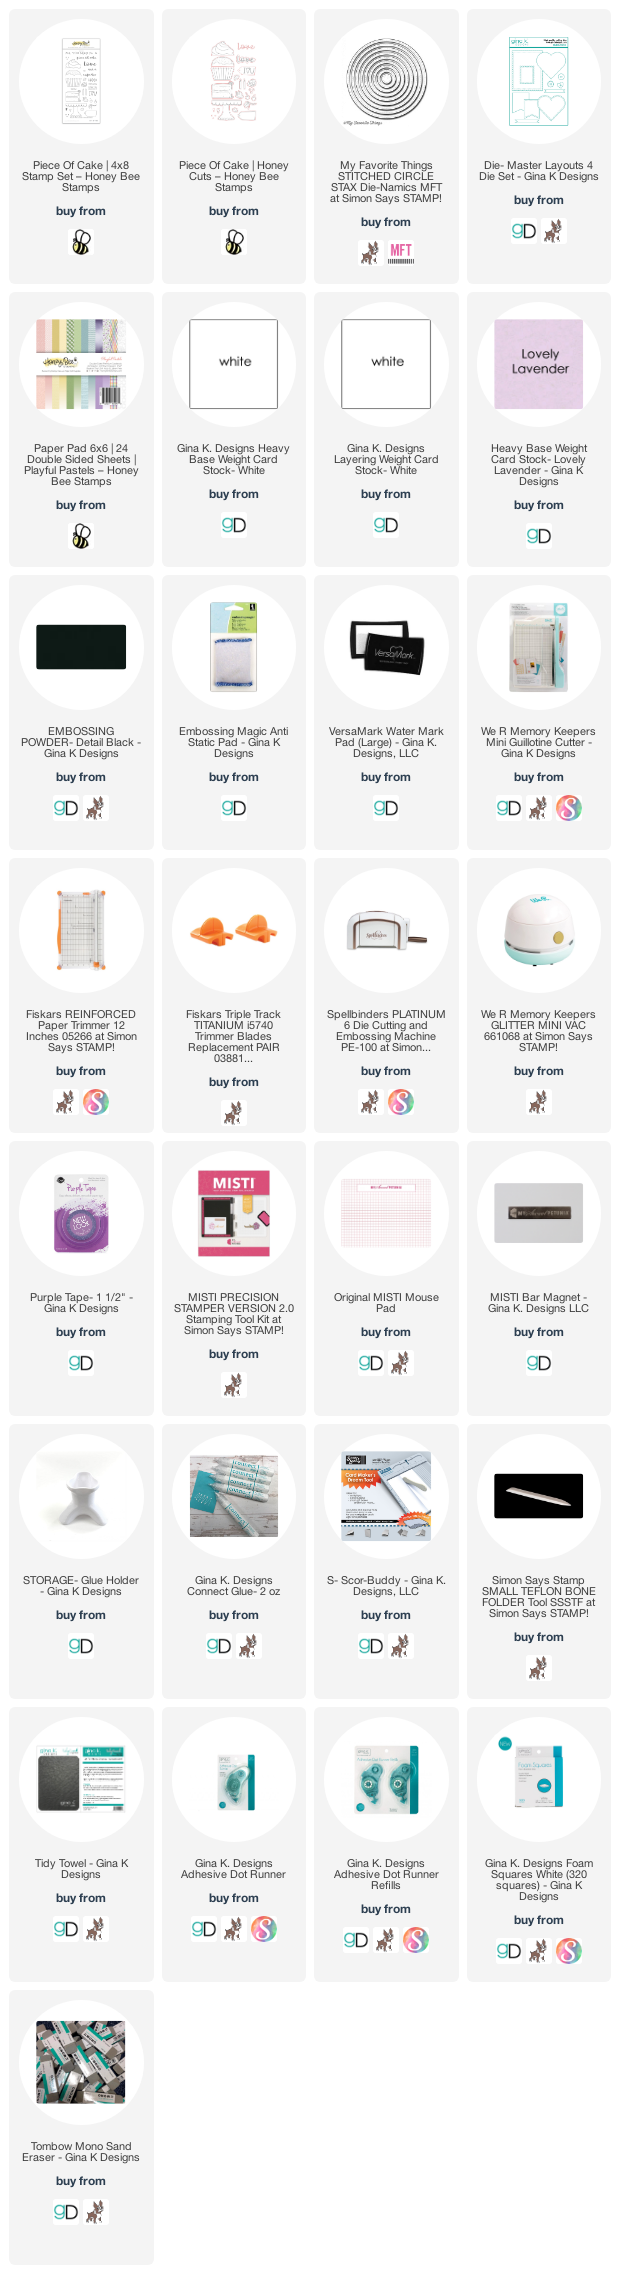
Here are the supplies I used for this card. Affiliate Links used at no cost to you.

Kat Scrappiness - #Ukrainestrong!

Wednesday, July 13, 2022

Hello everyone!

I am here with Kat Scrappiness featuring the #Ukrainestrong 6x8 stamp set with coordinating dies and the #UkaineStrong 6x8 Paper Pack.  Last month this set was sold as a bundle, you can now get the individual sets.   Kat Scrappiness has extended the fundraiser and will continue to donate the profits from the sales to the Ukraine Crisis Relief Fund via GlobalGiving.org.  You can find them HERE.

Here is my card for your inspiration:


Here is how I created the card.

1. Card is a Mini Slimline measuring 6″ x 3 1/2″ (6″ x 7″, scored at 3 1/2″ on 7″ side).

2. Die cut the design paper panel with Mini Slimline Never Ending Dies and the frame is from Mini Slimline Tri-Frame Dies.

3. Stamped the sentiment from the #Ukrainestrong stamp set and die cut it with the Double Stitched Square Dies.

4.  Stamped the #ukrainestrong and die cut it using the Boxed Sentiment Strip die.

5. Stamped and die cut the ribbon from the #Ukrainestrong 6x8 stamp set with ink from my stash.

6. Assembled the card and for finishing touches added the KS Daisy Days Enamel Dots.


Thank you for stopping by, please come back again.

Here is a list of supplies I used on my card, Affiliate Links used at no additional cost. Thank you for your support.

MERRY LITTLE CHRISTMAS CHALLENGE BLOG (MLCCB) - Let It Snow!

Friday, July 1, 2022


Hello everyone!

I’m  excited to be joining the Merry Little Christmas Challenge Blog design team! It’s an Anything Goes Christmas challenge. I have the cuties card to share with you. I hope you will come play along with the Christmas Challenge. It will run for six weeks, ending at 4:00 PM Mountain Time on the 15th of next month, so get out your crafty Christmas stash and come play with us!

Here is my card for your inspiration:

My card I created I used the Lawn Fawn Giant Let It Snow die, Lawn Fawn Stitched Snowflake Backdrop, and the stamp set is from Whipper Snapper Designs Ozzie & Harriet Stamp set.  I ink smooshed the background and used the stitched snowflake backdrop.  I colored the images with copics.  

I hope I have inspired you to play along with the Merry Little Christmas Challenge.  The theme is always Christmas...perfect time to get some Christmas cards done to send out during the holiday.

Thank you for stopping by, please come play along!


Newton's Nook Design -JUNE 2022 RELEASE - REVEAL DAY 4

Thursday, June 16, 2022


Hello everyone!
I am here with Newton's Nook Designs and today is the last day of the reveal the new  products will be available tomorrow,  Friday, June 17th. The design team is featuring "Newton's Kite" 3x4 Stamp Set and coordinating dies. For more inspiration please visit Newton's Nook Design Blog to see what the design team has created.

Here is my card for your inspiration:

Donna Idlet, Newton's Nook Designs, Newton's Kite, die cutting, copic coloring, new release, kites,

Here is how I created my card:
  • A2 card measuring 4 1/4″ x 5 1/2.
  • Die cut the top layer using the Summertime Paper Pad.
  • Cut a piece of paper from the Summertime Paper Pad, added it to a piece of paper and die cut the layers using the Frame & Flags die set
  • Created the clouds by die cutting the Sky Borders Die Set and using them as a stencil.
  • Stamped the images from "Newton's Kite"  Stamp Set, colored with alcohol markers and die cut it with the coordinating dies.
  • Stamped the sentiment from the "Newton's Kite"  Stamp Set onto the card using black ink.
  • Assembled the card.

Would you like to win the “Newton’s Kite” Stamp Set? This stamp set will be given away to ONE lucky winner!

Here's how to win: Comment on the NND blog and Design Team blogs (see list below)! The winner will be chosen at random from the collective reveal posts. Make sure to check out each of their blogs and comment for your chance to win. You will not know which blog has been chosen so the more you comment on the better your chances are of winning! Today is the last day to comment if you are interested in winning any of the stamp sets!  -- winners will be announced on the blog post on Friday June 17th.

Check out all the awesome Design Team Blogs below to enter:

Newton's Nook Designs

Donna Idlet

Ellen Haxelmans

Tina Herbeck

Larissa Heskett

Samantha Mann

Zsofia Molnar

Maria Russell

Farhana Sarker

Tatiana Trafimovich

Amanda Wilcox


I hope you have been inspired this week and have enjoyed everyone's cards.  The release will be available tomorrow, June 17th.  Don't forget to check the Newton's Nook Designs to see if you may have won anything.

As always, thank you for stopping by and continue to stop by for more inspiration.


Newton's Nook Design -JUNE 2022 RELEASE - REVEAL DAY 3

Wednesday, June 15, 2022

Hello everyone!

I am here with Newton's Nook Designs and today is Reveal Day 3 of the NEWLY released products that will be available on Friday, June 17th. The design team is featuring "Dog Park" which is a 3x4 Stamp Set and coordinating dies. For more inspiration please visit Newton's Nook Design Blog to see what the design team has created.


Here is my card I created today for your inspiration:

Donna Idlet, Newton's Nook Designs, Dog Park, die cutting, copic coloring, ink blending, fence die cut,

Here is how I created it:
  • A2 card measuring 4 1/4″ x 5 1/2.
  • Created the clouds by die cutting the Sky Borders Die Set and using them as a stencil.
  • Die cut the top grass layer of the card using the Land Border Die Set.
  • Used an ink cube to create the woodgrain on a piece of cardstock and die cut the Fence Die Set.
  • Stamped the images from the"Dog Park" Stamp Set, colored with alcohol markers and die cut it with the coordinating dies.
  • Stamped the sentiment from the "Dog Park" Stamp Set onto the card using black ink.
  • Assembled the card.


Would you like to win the “Dog Park” Stamp Set? This stamp set will be given away to ONE lucky winner!

Here's how to win: Comment on the NND blog and Design Team blogs (see list below)! The winner will be chosen at random from the collective reveal posts. Make sure to check out each of their blogs and comment for your chance to win. You will not know which blog has been chosen so the more you comment on the better your chances are of winning! You have until Thursday June 16th at 9pm ET to comment -- winners will be announced on the blog post on Friday June 17th.

Check out all the awesome Design Team Blogs below to enter:

Newton's Nook Designs -JUNE 2022 RELEASE - REVEAL DAY 1

Monday, June 13, 2022


Hello everyone!

I am here with Newton's Nook Designs and today is Reveal Day 1 of the NEWLY released products that will be available on Friday, June 17th. The design team is featuring "Beach Bound" stamp set and coordinating Die set, "Summertime Paper Pad" and "Palm Tree Line Stencil". For more inspiration please visit Newton's Nook Design Blog to see what the design team has created.


Here is my card I created today for your inspiration:

Donna Idlet, Newton's Nook, Beach Bound, die cutting, summer , palm tree line stencil, Summertime Paper Pad, copic coloring, ink blending, beach, jeep, cars

Here is how I created it:
  • Mini Slimline Card Base: 3 1/2" x 6" (7" x 6", scored at 3 1/2" on the 7" side).
  • Top layer measures 3 1/4 x 5 3/4
  • Masked off about an inch from the bottom and inked blended the sand and the sky.  Used a couple of alcohol markers to add details to the sand.
  • Created the trees with the Palm Tree Line Stencil.
  • Cut the water from the Summertime paper pad.
  • Stamped, colored the images with alcohol markers and die cut the vehicles from the "Beach Bound" stamp set and die cut with the coordinating dies.
  • Stamped the sentiment from the "Beach Bound" stamp set.
  • Assembled the card.

Would you like to win the “Beach Bound” Stamp Set? This stamp set will be given away to ONE lucky winner!

Here's how to win: Comment on the NND blog and Design Team blogs (see list below)! The winner will be chosen at random from the collective reveal posts. Make sure to check out each of their blogs and comment for your chance to win. You will not know which blog has been chosen so the more you comment on the better your chances are of winning! You have until Thursday June 16th at 9pm ET to comment -- winners will be announced on the blog post on Friday June 17th.

Check out all the awesome Design Team Blogs below to enter:

Kat Scrappiness - Happy Belated Birthday

Monday, May 30, 2022

Hello everyone!

I am here with Kat Scrappiness featuring the adorable stamp set from KS called "Stewart The Sloth" Stamp Set and the A2 Postcard die.  I love how the card came together with the A2 Postcard Die as the background.


Here is how I created the card.

1. Card is an A2 size - 5 1/2 x 4 1/4 card base.

2. Die cut the Postcard die using Kraft paper, the postcard die measures 5 1/2 x 4 1/4, adhered the postcard panel onto the card base.

3. Stamped and die cut the images from the "Stewart The Sloth" Stamp Set.  Colored the images with copics and added the images onto the card.

4. Stamped the sentiment from the "Stewart The Sloth" Stamp Set in black ink.

5.  Added the "hello" from the Reversed Scallop Mini Slimline W/Hello Die set.

Thank you for stopping by, please come back again.

Here is a list of supplies I used on my card, Affiliate Links used at no additional cost. Thank you for your support. 

Newton's Nook Designs - Hoppy Easter

Thursday, April 7, 2022

Hello everyone!

I am here with Newton's Nook to share a cute Easter/Springtime card.  I created this card by using the stamp set "Hoppy Greetings". This is a 4x4 stamp set that can be used for many occasions. 

Newton's Nook Designs, Hoppy Greetings, Stencil Bunny tails, Land Border Die set, Hoppy Greetings Die Set, Easter, copic coloring,die cutting, Donna Idlet

Here is how I created my card:
  • Card is an A2 card which measures 4 1/4 x 5 1/2.
  • Cute the black layer at 4" x 5 1/4" and the top layer at 3 3/4" x 5".
  • Ink blended the background with the NND Stencil Bunny tails. The blending started at the bottom and gradually lighten the blending to the top. Then used the top layering stencil to add glitter gel to the tails to give the background some dimension.
  • Stamped and colored the images with alcohol markers from the of the Hoppy Greetings stamp set and die cut with the coordinating dies.
  • Die cut the polka dot green paper from the Springtime Paper Pad with NND Land Border Die set.
  • Assembled the card.

I hope you were inspired to start creating your Easter cards.

Thank you for stopping by, please come back again soon!

Sweet n' Sassy Stamps - Sweater Weather

Wednesday, March 9, 2022

Hello everyone!

I am so excited to be guest designing for Sweet n' Sassy Stamps this month and April.  I am featuring the Stamp called Sweater Weather and the background Stencil called Knit. I know Spring is right around the corner, but the weather has been a little crazy here in Northern Virginia.  The weekend we had almost 80 degree weather and today the high is going to be 45 degrees and raining so we may need to wear a hat and scarf.

Here is my card for your inspiration:


 Here is how I created my card.

A2 card, measuring 4 1/4 x 5 1/2

Die cut the top panel and randomly stamped the images from the Sweater Weather Stamp set and colored them with copics.

Masked the images and inked blended the background with SNSS Knit stencil.

Added the sentiment.

Thank you so much for stopping by, please come back again soon.

Here is a list of supplies I used on my card, Affiliate Links used at no additional cost. Thank you for your support.

Gina K. Designs - Be My Valentine

Tuesday, January 25, 2022

Hello everyone!

I sharing some cards from the Gina K. Designs NEWLY release products from the January 2022 release.I am using the "Love Hearts" stamp and die sets illustrated by Beth Silaika. I am also using the "Sealed With a Kiss" stamp and die sets illustrated by Debrah Warner . You can see more inspiration from the full release on the Gina K. Designs & StampTV Friends Facebook page. To see the full release, you can go HERE under the What's New section.

Here are my cards for your inspiration and how I created them: 

valentine cards, Gina K. Designs, Stamp TV, die cutting ,Sealed with a Kiss, Love Hearts,

My card is an A2 card, I used the GKD Master Layout 1 for the layers. I stamped various hearts from the "Love Hearts" stamp set.  Stamped the sentiment and heat embossed with clear embossing powder.  

valentine cards, Gina K. Designs, Stamp TV, die cutting ,Sealed with a Kiss, Love Hearts,

My second card is a square card, I used Master Layout 3 to die cut the layers.  I used the GKD  "Sealed With a Kiss" stamp set to stamp the hearts in rainbow order. 

Thank you so much for stopping by, I hope I have inspired you!

Here are the supplies I used for these cards, Affiliate Links used at no cost to you.

GINA K. DESIGNS JANUARY 2022 RELEASE

Monday, January 24, 2022

Hello everyone!

I am here sharing some cards from the Gina K. Designs NEWLY release products from the January 2022 release. This is another fabulous release as always! I am using the "Love Hearts" stamp and die sets illustrated by Beth Silaika. I am also using the "Sealed With a Kiss" stamp and die sets illustrated by Debrah Warner . You can see more inspiration from the full release on the Gina K. Designs & StampTV Friends Facebook page. To see the full release, you can go HERE under the What's New section.

Here are my cards for your inspiration and how I created them:

Gina K. Designs, Valentine Cards, die cutting, Sealed with a Kiss, Love Hearts, Stamp TV

My card is an A2 card, the scalloped layer is from the GKD Master Layout 4 and ink blended the background with GKD Bubblegum Pink ink. I then die cut strips from the GKD Master Layouts 8, I used GKD card stock and randomly placed the strips on a piece of paper and die cut it with the heart die cut from Master Layouts 8.  I die cut the heart from GKD "Love" word and replaced the "O" from the word Love with one of the heart from "Love Hearts" stamp set.  I assembled the card and added the sentiment from the Love Hearts stamp set.

Gina K. Designs, Valentine Cards, die cutting, Sealed with a Kiss, Love Hearts, Stamp TV, COPIC coloring

My second card is also an A2 card, the heart layer is from GKD Heart Cover Plate, the black layer I die cut from Master Layouts 2.  I die cut the GKD "hugs" word die and layered it three times for dimension.  I stamped and colored the heart and flower image with copics from GKD  "Sealed With a Kiss" stamp set and die cut.  I stamped the sentiment with GKD white embossing powder and die cut it with GKD sentiment strip from Master Layouts 2

Thank you so much for stopping by, I hope I have inspired you!

Here are the supplies I used for these cards, Affiliate Links used at no cost to you.

Kat Scrappiness - Haunted House

Monday, September 13, 2021

Hello everyone!

I am here with Kat Scrappiness, Inc., sharing this fun haunted house I created using the newly released Home Sweet Home die set with the Haunted House Add-On Dies, Crafters Essential Halloween dies.  I am also using the newly released Boo-Gy Ghosts Die, Dress Up Quokka Stamps set with the cut files and the Quokka Halloween Costume Add On Stamps set and dies! This was such a fun release!  I had so much fun creating with all the Halloween sets.  


Here is how I created the card:
  • Ink the background using distress inks.
  • Cut the House Frame using the Home Sweet Home die set. Cut the windows from the Haunted House Add-On Dies and add vellum behind them.
  • Cut pieces from the Crafters Essential Halloween dies.
  • The Quokka is from the Dress Up Quokkas, adding the elements from the Quokka Halloween Costume Add On Stamps set. The ghost is from the Boo-Gy Ghosts Die set.
  • After cutting everything assembled the card.
Another look at the card.


Thank you so much for stopping by, please head over to Kat Scrappiness blog for more inspiration.

Here is a list of supplies I used on my card, Affiliate Links used at no additional cost. Thank you for your support.

GINA K. DESIGNS AND THERMOWEB - GNOME FESTIVE FALL BUNDLE ADD ON

Monday, August 23, 2021


Hello everyone!

I am here with Gina K. Designs and Thermoweb featuring the newly released Gnome Add-On Festive Fall Bundle.  Please note the Gnomes are sold in the Gnome for the Holiday set,  this accessory kit has new hats, hands and coffee cup  and lots more!

If you missed the Gnome for the Holiday Bundle that was released last year, you can get it!  This kit is filled with fun stamps, dies and a stencil to make adorable gnome cards! Get it now because it's only available for a limited time and once it's gone, it's gone! Come join the instagram hop here, to be inspired by so many designers.  There is an opportunity to win one of four $50 gift cards to shop with Gina K. Designs and Thermoweb!   The hop will end on Monday, August 30th. 


I have created three cards for your inspiration:


My first card is a slimline card measuring 6 1/2” x 6 1/4”, score at 3 1/4”, top layer and bottom layer were cut using the Master Layouts 7.

Supplies Used:  
GKD Master Layout 7


Second card is an A2 card measuring 4 1/4 x 5 1/2

Supplies Used:  
GKD Master Layout 2 and 7


Lastly, this card is an A2 card measuring 4 1/4 x 5 1/2

Thank you so much for stopping by, I hope you have been inspired.  Don't forget to join the hop for a chance to win gift cards to shop with Gina K. Designs and Thermoweb.

Here are the supplies I used for these cards, Affiliate Links used at no cost to you. Thank you for your support!

Kat Scrappiness - Say Cheese

Friday, August 20, 2021

Hello everyone!

I am here with Kat Scrappiness, Inc., sharing a mini slimline card using the NEW coordinating die set to the fun Quokka'n Up Stamp set. The cut photo frame that I have the Quokka's in come with the coordinating die set. I am also using the Rainbow Confetti Slimline paper pad to create my card.

Here is my card for your inspiration.

Here are the steps to create this card:
  • Cut the White Slimline Card Base: 6″ x 3 1/2″ (6″ x 7″, scored at 3 1/2″).
  • Top layer cut using the Mini Slimline Embossed Edge Dies.
  • Cut Black Mat: 3 1/4″ x 5 11/16″
  • Cut piece of pattern paper from the Rainbow Confetti Paper Pad.
  • Stamp the Quokka’s from the Quokka'n Up stamp set, colored with copics. 
  • Die cut Quokka's from the Quokka'n Up coordinating die set. 
  • Assembled the card and finished off with adding the newly released Plum Pearl Mix to the card.  To see all the pearl embellishments, you can find them here. (pic of the pearls I used is below)
Thank you so much for stopping by, please visit Kat Scrappiness blog for more inspiration.

Here is a list of supplies I used on my card, Affiliate Links used at no additional cost. Thank you for your support.


GINA K. DESIGNS JULY 2021 RELEASE

Monday, July 19, 2021

Hello everyone!

I am here sharing a couple of cards from the July 2021 release by Gina K. Designs using the Absolutely Autumn stamp set and Absolutely Autumn die set illustrated by Beth Silaika. You can see more inspiration from the full release on the Gina K. Designs & StampTV Friends Facebook page. To see the full release, you can go HERE under the What's New section.

Here are my cards for your inspiration:

My first card is a mini slimline card:
  • Card base measures 7” x 6”, score at 3 1/2”, black layer measures 3 1/4 x 5 3/8, and the top layer is 3 1/8 x 5 5/8.
  • Top layer is cut using the Kat Scrappiness Double Stitched Mini Slimline Dies.
  • I stamped inked blended the background with GKD inks, I then randomly stamped the leaves from the Absolutely Autumn stamp onto the card.
  • I cut a piece of GKD Velum Paper the size of the layer and stamped the sentiment from the Absolutely Autumn stamp set, heat embossed in black. I attached the vellum to the card.
  • Finish the card by adding some GKD Sugar Plum sequins.

My second card is also a mini slimline card :
  • Card base measures 7” x 6”, score at 3 1/2”,  black layer measures 3 1/4 x 5 3/8, and the top layer is 3 1/8 x 5 5/8.
  • Top layer I ink blended around the edges.
  • Stamped the leaves from the Absolutely Autumn Stamp set, colored with copics and die cut the leaves.  Placed the leaves onto the card.  
  • Die cut the "thankful" from GKD Thankful die, added vellum to the back and added it to my card.
  • Finish the card by adding some GKD Sugar Plum sequinsFinish the card by adding some GKD Sugar Plum sequins
Thank you so much for stopping by, I hope you have been inspired.

Here are the supplies I used for these cards and the links to the NEWLY released items. Affiliate Links used at no cost to you.  Thank you for your support!  
Here is the total release for the GKD July 2021 Release. Affiliate links used at no cost to you. Thanks again for your support!

Retro Rubber Challenge Blog #158 - Tic Tac Toe

Tuesday, May 11, 2021

 Hello everyone!

I am here with Retro Rubber Challenge Blog with a new challenge, which is a tic tac toe created by our own design team member Jan Clothier. I hope you will join in on the fun. Be sure to stop over on the Retro Rubber Challenge blog to get more inspiration, the design team has some wonderful creations!

The rules to play along with Retro Rubber Challenge is very simple, make sure the stamp you use on your project is at least one year or older. For more details on the rules, you can find them over on Retro Rubber Challenge blog.

*Entering this card into the Honey Bee Stamps Buzz Worthy Challenge #74.


Here is my card for your inspiration. I am using Honey Bee stamp set called Piece of Cake. The set was released in January 2019.


My card is an 4 1/4 x 5 1/2, I cut the background paper from a die in my stash. I then die cut the stitched circle die and added it to the card.  I stamped the images and colored them with copics.  I did cut them out and added them to the card.  I stamped the sentiment with versamark and added black embossing powder and heat set it.  I die cut it and added it to my card.  I finished off my card by adding some stickles to give the cake some sparkle. 

Thank you for stopping by, I hope you will stop by the Retro Rubber Challenge blog and join the fun and check out the beautiful projects the design team members have created.

Here is a list of supplies I used on my card, Affiliate Links used at no additional cost. Thank you for your support.

Made With Love By The Dutch Lady Designs
Follow Me on Pinterest