Showing posts with label Rinea Foiled Paper. Show all posts

Rinea - You're So Precious to Me

Monday, May 4, 2020

Hello everyone!

I am here with Rinea and I am sharing a Mother's Day card with you today. I hope you all have had a chance to get your mother's day cards done and are in the mail by now. I am using the Rinea Blush/Blush Starstruck Foiled Paper, Fuchsia/Fuchsia Starstruck Foiled Paper, Violet/Gold Glossy Foiled Paper, Lavendar/Gold Glossy Foiled Paper and Arctic/Gold Glossy Foiled Paper

Here is how I created my card.

1. My card is an A2 card measuring 4 1/4 x 5 1/2,

2. I cut the Rinea Blush/Blush Starstruck Foiled Paper to 4 1/4 x 5 1/2 and adhered it to my card,

3. I then die cut a background from the  Fuchsia/Fuchsia Starstruck Foiled Paper and adhered it to the card,

4. I then die cut the word mom  with  Violet/Gold Glossy Foiled Paper and Lavendar/Gold Glossy Foiled Paper  and used foam dots to adhered to the card,

5.  I stamped the sentiment with Black Stazon Ink, then die cut the sentiment with a stitched die.


Closer look of the card.


I hope you have been inspired by my project today. Thank you so much for stopping by, please come back again soon!


Rinea - Just for You

Saturday, December 21, 2019

Happy Holiday's everyone!

It's almost Christmas, I hope everyone that celebrates is ready and will enjoy your family this holiday season!  I am here with Rinea to share a gift idea for the holiday season or this idea can be used for any occasion.  Here are the Rinea Foiled papers I used on my project:  Rinea Ruby Starstruck Solid Pack, Rinea Silver Starstruck Solid Pack , Rinea Ruby/Gold Glossy Solid Pack and the Rinea Emerald/Gold Glossy Solid Pack.  Listed below are all the supplies I used on this project.

Here is how I put my card together.  These pillow boxes can be used to put gift cards inside, candy for favors or even jewelry as a gift.  I love how these turned out and will be great to put gifts in for the holiday season.

1.  I first die cut the pillow box with the Rinea Ruby Starstruck Solid Pack and belly band that is around the box with Rinea Silver Starstruck Solid Pack and adhered them together with some strong adhesive,


2. I then die cut the layers of the poinsettia with Rinea Ruby/Gold Glossy Solid Pack and the leaves with Rinea Emerald/Gold Glossy Solid Pack.  I then added the flower with liquid glue,


3.  I had these 3 x 3 note cards in my stash I die cut the words "just for you"  from the Rinea Ruby/Gold Glossy Solid Pack and Rinea Silver Starstruck Solid Pack and adhered it to the card.  These will be perfect to add a note to give the gift to a special person.


Here is a view just of the pillow boxes.


Thank you so much for stopping by, I wish all of you a very Merry Christmas and a Happy New Year!

Listed below are the products I used. Click on the link to go directly to the product. Where available I have used compensated affiliate links which means if you make a purchase I will receive a small commission at no extra cost to you. Thank you so much for your support!

SUPPLIES USED:


Rinea - Joyous Holiday

Wednesday, December 4, 2019

Happy Holiday's everyone!

I am here with Rinea to share a holiday card with you.  Here are the Rinea Foiled papers I used on my card:  Rinea Copper Starstruck Solid Pack, Rinea Silver Starstruck Solid Pack , Rinea Ruby/Gold Glossy Solid Pack, and the Rinea Emerald/Gold Glossy Solid Pack.

Here is how I put my card together:

1. My card measures 5 1/2 x 4 1/4,

2. The first layer is the Rinea Copper Starstruck Solid Pack paper, which measures 5 1/2 x 4 1/4.

3. I then die cut the silver frame with Rinea Silver Starstruck Solid Pack and adhered it to the top layer using liquid glue,

 4. I then die cut the layers of the poinsettia with Rinea Ruby/Gold Glossy Solid Pack and the leaves with Rinea Emerald/Gold Glossy Solid Pack.  I put the poinsettia together with foam tape in between the layers to give it some depth.  I then added the flower to my card with liquid glue.  I colored some white pearls with a Copic marker and added them to the center of the flower. 

5.  I die cut the joy from the Rinea Ruby/Gold Glossy Solid Pack and adhered it to the card.

6.  I stamped and heat embossed the sentiment and added foam tape and adhered it to the card. 


Here is a closer look at the card.


Here is a closer look at the poinsettia and leaves, I love the details you get when you use the foiled papers on die cuts.


Thank you so much for stopping by, please come back again soon.

Listed below are the products I used. Click on the link to go directly to the product. Where available I have used compensated affiliate links which means if you make a purchase I will receive a small commission at no extra cost to you. Thank you so much for your support!

SUPPLIES USED:


Rinea - Grateful Coffee Cup

Monday, November 4, 2019


Hello everyone!

I am here with Rinea sharing a coffee giftcard. I used the Rinea Marigold/Gold Glossy Foiled Paper, Rinea Mocha/Gold Glossy Solid Packs , Rinea Copper/Copper Starstruck Solid Packs and Ebony/Gold Glossy Foiled Paper.foiled papers on my card.

I'm also playing along with the Fall/Winter Coffee Lover's Blog Hop. If you would like to join in the fun the hop is from November 1-10 and can be found here.

1. My coffee card measures 4 1/2 x 4 1/4, it would fit perfect in an A2 envelope,

2. I die cut the coffee cup with Rinea Marigold/Gold Glossy Foiled Paper, I then die cut the top of the coffee mug and the leaf with Rinea Mocha/Mocha Starstruck Solid Packs, the word "for you" and "grateful" I die cut with Rinea Copper/Copper Starstruck Solid Packs. The back of the "for you" I added some Ebony/Gold Glossy Foiled Paper and put the pieces back in the two "o's" and "r".

3.  After I cut all my elements, I adhered them all together with liquid glue onto the base of the card.

I love how this coffee card turned out, you will definitely see this again! The supplies I used are listed below.


Here is a closer look at the card.


Here is the inside of the card, I die cut the card hold with Rinea Marigold/Gold Glossy Foiled Paper, I adhered the holder to the cup with liquid glue and then added the giftcard. Perfect gift to give someone you are grateful for.


Thank you so much for stopping by, please come back again soon.

Supplies Used:

Rinea - Peacock Frame

Friday, October 4, 2019

Hello everyone!

I am here with Rinea with a cute frame that I created using the peacock as the vocal image. To create the peacock I had to cut many layers. The background I used the Rinea Violet/Gold Glossy Solid Foiled Pack. The layers on the peacock are Rinea Sapphire/Gold Glossy Solid Foiled Pack, Rinea Lavendar/Gold Glossy and Solid Foiled Pack, Rinea Blush Gold Glossy Solid Foiled Pack.


Here is how I put my frame together:

1. The frame is a 6x6 frame with a 5x5 opening,

2. I cut a piece of the Rinea Violet/Gold Glossy Solid Foiled  paper to 5x5, I used a stencil I had with peacock feathers and ran it through my die cutting machine  I die cut the pieces of the peacock and used liquid glue to put it together.  I then adhered the peacock in the center of the frame.  After everything was dried I added the glass to the frame.

Here is a closer look:


Thank you so much for stopping by, please come back again soon.

Joy Clair and Rinea Collaboration - Mermaid at Heart

Wednesday, September 4, 2019

Hello everyone,

I am here with Joy Clair Stamps and Rinea, all month long the design teams will be sharing some wonderful projects created with Rinea's beautiful foiled paper and Joy Clair's stamps.  Please be sure to stop by Joy Clair Stamps and Rinea Blogs this month to see what the design teams have created.

Here is my project created with Joy Clair's newly released stamp set called "Mermaid at Heart".  This stamp set is fintastic, lots of bold sentiments are in this set and I love the mermaid tail.  

My card is an A2 size card, I stamped the mermaid tail from the "Mermaid at Heart" stamp set using the Rinea Foiled Paper.  I stamped on the foiled paper with StazOn Jet Black ink, using Rinea Marigold/Gold Glossy Foiled Paper and Turquoise/Gold Glossy Foiled Paper.  I then stamped the sentiment on white card stock using black ink.  The background I used Rinea Sapphire/Gold Glossy Foiled Paper and added Jade/Gold Glossy Foiled Paper to the background. 


Here is another look at the card.


Thank you for stopping by! Please follow Joy Clair's facebook page, Color by Faith Bible Journaling facebook page, Instagramand Twitter, be the first to hear the news, sales and giveaways! They also have a Pinterest page and Youtube channel for your inspiration!


Rinea - Happy Father's Day!

Tuesday, May 21, 2019

Hello everyone,

I am back again sharing a Father's Day card I created using Rinea Foiled papers.  On this card, I have used the Rinea Rinea Mocha/Gold Glossy Solid Packs & Rolls, Rinea Mocha/Mocha Starstruck Solid Packs & Rolls and Rinea Sapphire/Gold Glossy Solid Packs & Rolls Foiled Papers.

Here is how I created my card:

1.  My card is an A2 size card (4 1/4 x 5 1/2)
2.  I cut the Mocha foiled paper at 4 1/4 x 5 1/2 and adhered it to the base of my card,
3.  I then die cut the Sapphire Foiled Paper and adhered it to the base of the card.
4.  I then die cut a circle out of vellum, die cut the word "dad" with Rinea Mocha Starstruck Foiled Paper and adhered it to the vellum piece,
5.  I stamped the sentiment with versamark, added white embossing powder and heat set it.  I die cut the sentiment added some foam tape on the back and added it to my card.


Closer look at my card


Thank you so much for stopping by, please come back again soon!
Supplies Used:

Be My Valentine

Friday, January 4, 2019


Happy New Year everyone!

I hope you enjoyed your holiday season! I'm sharing a Valentine masculine themed card today. Be sure to stop over to Rinea blog to see some beautiful designs created by the design team.

My card is a top folding card measuring 4 x 4. I used the Rinea Love Foiled Paper Variety Pack. This card can definitely go to your loved one whether male or female. The colors in this pack are so beautiful, I love the rich bold colors. The silver layer measures 3 7/8 x 3 7/8. The heart background is a die I had in my stash, I die cut it and adhered it to my card. I stamped the sentiment, colored the raccoon with copics, fuzzy cut him out and popped it up on my card.


Thank you for stopping by, please come back again soon!

Listed below are the products I used. Click on the link to go directly to the product. Where available I have used compensated affiliate links which means if you make a purchase I will receive a small commission at no extra cost to you. Thank you so much for your support!

SUPPLIES USED:

Rinea - Peace!

Friday, December 21, 2018

Hello everyone!

I am here again this month with Rinea sharing this beautiful Christmas card. I am using the Foiled Paper Frosted Variety Pack made by Rinea.

My card is a top folding A2 card measuring 4 1/4 x 5 1/2. I die cut three different colors from the Rinea Foiled Paper Frosted Variety Pack, I used liquid adhesive to attach the layers and attached it to my card base. I cut the peace word out of two colors from the Rinea Foiled Paper Frosted Variety Pack and adhered it. I finished off the card by adding some dew drops.


 Closer look


Thank you so much for stopping by, please come back again soon!


Rinea - Merry Christmas Tags

Tuesday, December 4, 2018

Hello everyone!

I am here with Rinea to share some cute Christmas tags created with the Rinea Foiled Papers.  These are perfect for the gifts that you have to wrap for the holidays!  Can you believe Christmas is just 23 days away?  Have you finished your shopping and making you cards? 

For my tags I am using the Rinea Artist's Packs Variety Frosted and Variety Jolly.  These are beautiful holiday colors and would be perfect for any holiday project you may have! 

Here is how I created my tags:

1.  I die cut all the elements for the tags. 

2.  I used liquid glue to adhere all he pieces to my tag.

3.  For the candy cane tag and the Christmas tree tag, I used dies to create the images, using the Rinea Foiled Jolly paper.  I used some foiled paper in the background so the images would stand out.  I added some rhinestones on the candy cane tag and the Christmas tag along with a snowflake at the top of the tree.  The beautiful blue tag created with the Rinea Foiled paper Frosted I added some snowflakes die cut with the foiled paper.  I added some dew drops in the center of the snowflakes.

4.  To finish the tags off, I added the strings by using foiled paper.


The back of the tags.


Another close look of the tags.


Thank you so much for stopping by, please come back again soon!

Rinea - Blessed

Wednesday, November 21, 2018

Hello everyone,

I am back again with Rinea and Imagine Crafts. I hope you have been enjoying the month long collaboration with Imagine Crafts. If you have not visited the Rinea blog, please do for more inspiration.

I am using the Rinea foiled paper "Earth Tone Variety Pack" on my card.

Here is how I put my card together:

1. My card is an A2 size card, I cut my first layer using the Earth Tone Variety Pack,

2. The next layer I cut and created my background using the Imagine Crafts Firework Product Desert Sand and Pear Tart.  I finished the background off by adding some of my favorite Shimmer Craft Spray Sparkle.

3. I die cut the elements that I used on my card from the Earth Tone Variety Pack foiled paper. I adhered them to my card using the Imagine On Point Glue,


Another look at the card.


Thank you for stopping by, please come back again soon!


Rinea - Happy Fall

Sunday, November 4, 2018

Hello everyone!

I am here with Rinea and we are collaborating all month with Imagine Crafts! All month long you will see some beautiful projects created by the design team. So be sure to stop over at Rinea blog to get more inspiration.

I am using the Rinea foiled paper pack "Haunted Variety Pack" on my card.

Here is how I put it together:

1. I cut my first layer using one of the sheets from the Haunted Variety Pack foiled paper pack.

2. I then cut the next layer with some card stock and adhered it to the foiled paper.

3. I die cut several leaves using the Haunted Variety Pack. I adhered them onto my card using the Imagine On Point Glue.

4. I stamped the sentiment using StazOn Spiced Chai ink and heat embossed it with the Imagine embossing powder Iridescent.

5. I finished off my card by adding my favorite of all times, Imagine's Sheer Shimer Craft Spray Sparkle. I find myself using this spray on a lot of my cards, especially now since it is the holiday, it gives my cards a beautiful finish.


Thank you so much for stopping by, please come back again soon!

Rinea - Hello

Friday, September 21, 2018

Hello everyone!

I am here with Rinea with a clean and simple card.  The design team is continuing to showcase  Rita Barakat  beautiful stamps and stencils.  

I am using the Rita Barakat "So you say you can't draw" stencil.  I decided to use the stars on the stencil to create my background.  I used distress inks on the background and then added the stars.  I die cut the "hello" with Princess Foiled Paper Variety Pack, I attached the die cut piece to some black foam to give the word some dimension.  I finished the card off by adding some rhinestones.    


Another look at my project 

Thank you for stopping by, please come back again soon!

Joy Clair - Barn Party

Saturday, August 4, 2018

Hello everyone!

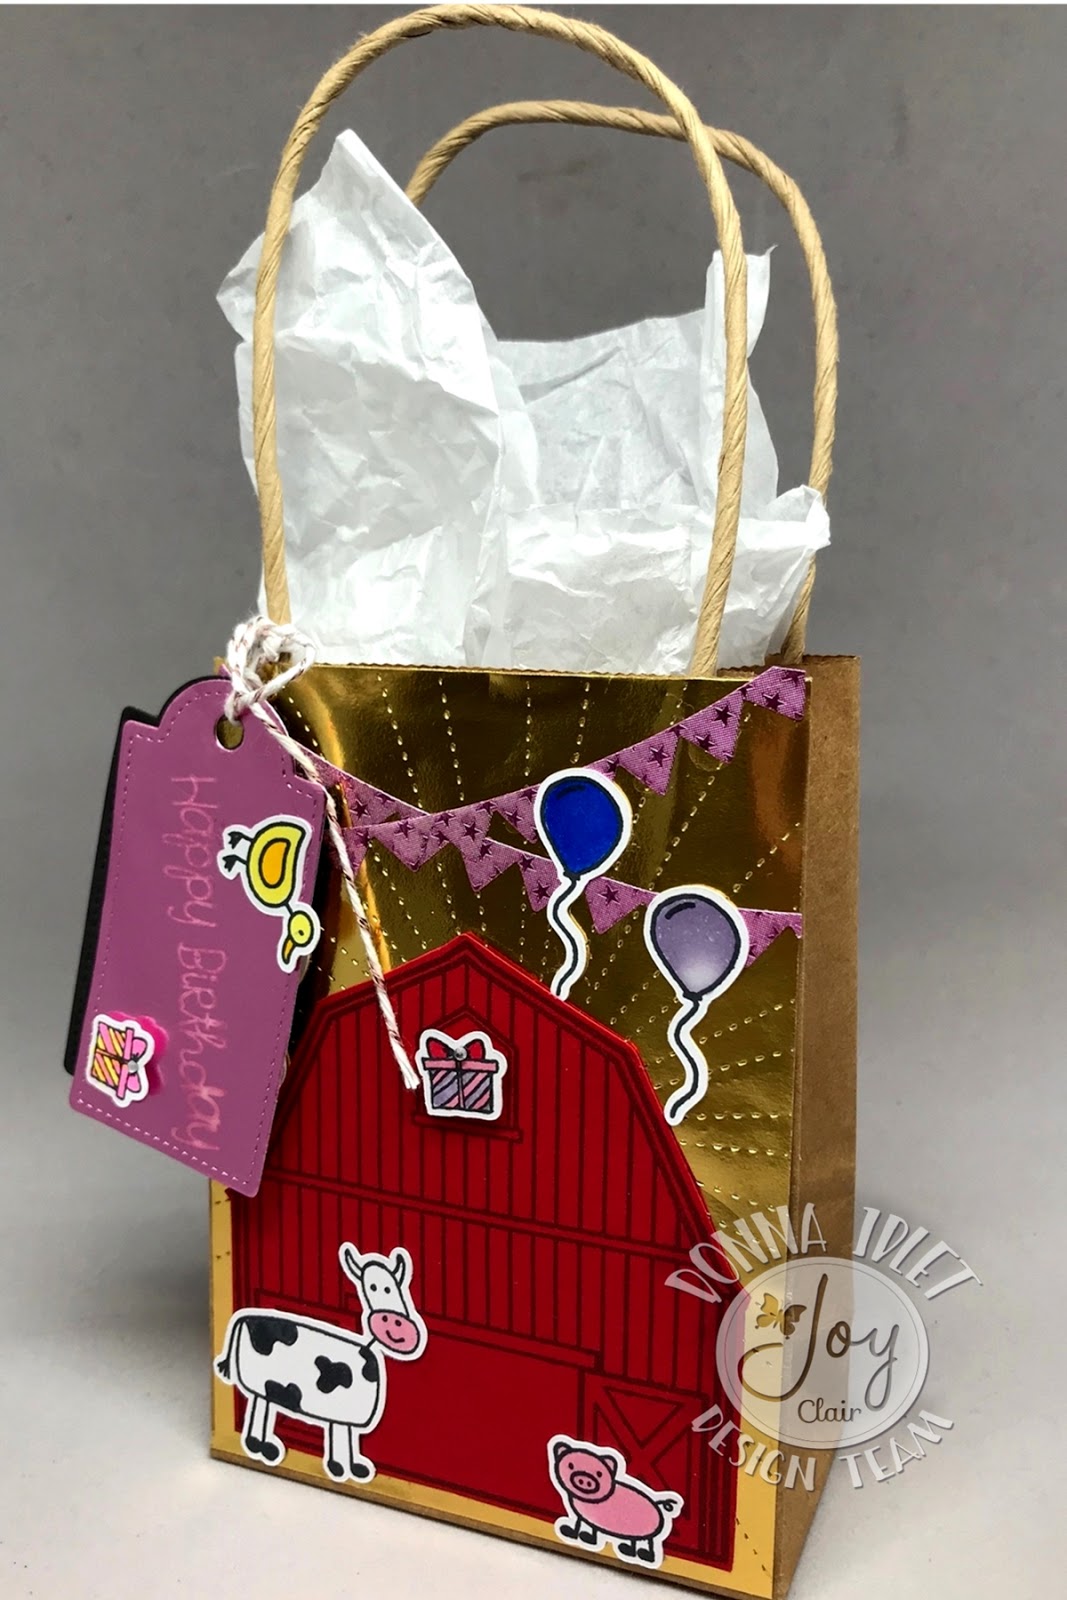
I'm here with Joy Clair and we are collaborating with Rinea for the whole month of August! I am featuring the newly released  Joy Clair stamp set Barn Yard, this is the cutest stamp set, it has several animal images and lots of elements to create your cards.  I am showcasing a birthday gift bag for you today.


I created the gift bag by creating a back panel with the Rinea Metallics Foiled Paper Variety Pack, I adhered this to the bag with wet glue (I find it easier to use wet glue when I am adhering the foiled paper).  I then stamped the images from the Joy Clair stamp set Barn Yard to use on the gift bag and colored them with copics.  I added all the elements to the bag.  I then die cut a couple of banners from the Rinea Princess Variety Foiled Pack and added them to the bag with wet glue.  I then created a gift tag with the Rinea Princess Variety Pack and then stamped the Happy Birthday from the Joy Clair stamp set Barn Party with the Rinea Ghost Ink.  I attached a black piece of cardstock to the tag and then used some twine to attach the tag to my bag.

Here is another look at the birthday gift bag.

Thank you so much for stopping by, stop over at the Joy Clair blog and see all the wonderful designs from the design team. Please follow Joy Clair's facebook page, Color by Faith Bible Journaling facebook page, Instagram and Twitter, be the first to hear the news, sales and giveaways! They also have a Pinterest page and Youtube channel for your inspiration!

Supplies Used:

Rinea - Celebrate

Wednesday, July 4, 2018

Happy 4th America!

I am here with Rinea, I am featuring the Patriotic Variety Pack today!  It is perfect because today is the 4th of July.  What are you all doing today to celebrate America's independence?  We are cooking out and having some folks over.  We will be eating well today!

Here is my card I am sharing with you today, my card is an A2 card, I cut a piece of red from the Patriotic Variety Pack the measures 4 x 5 1/2, then I cut out a silver layer measuring 3 7/8 x 5 1/4, I then die cut a punch of stars and added them to my card, I cut a piece of blue foiled paper and added it to the corner, I wanted my card to look like a flag.  I die cut the celebrate from some black foil, I stamped the sentiment and cut it out and used foam tape to pop it up.


Closer Look

Another look to see the die cut celebrate and stamped sentiment

I hope you enjoyed my card as much as I enjoyed creating it.  Please make sure to stop over on the Rinea blog to see all the wonderful designs from the team.  

Thank you for stopping by, please come back again soon!
Supplies Used:

Rinea - Congrats!

Thursday, June 21, 2018

Hello everyone!

I am back with Rinea, to share with you a graduation card. It's the time of year that everyone knows someone graduating, so I hope I will inspire you to make a special person to you a graduation card. I am featuring masculine cards, but I think this card could go either way. I just love the rich colors of the gold and red foil papers from the Magical Variety Pack, it goes so well together. I can just image beautiful Christmas cards using this pack! I think the possibilities are endless.

Another view of the card.


Here is how I made my card:

I used an SVG file using my Silhouette to die cut the base of the card and all the elements using Rinea foiled paper from the Magical Variety Pack,


I then used adhesive to add all the elements to the base of the card,


I made the tassel out of twine from my stash attached it with a large brad from my stash,

I stamped the sentiment, die cut it, and added it to my card.

I think my card is clean and simple, but any graduate I hope will love to receive it! This Magical Variety Pack is perfect for any occasion, please stop by Rinea blog to see all the wonderful creations created by the design team!

Thanks for stopping by, please come back again soon.

Supplies Used:

Rinea - Happy Father's Day!

Monday, June 4, 2018

Hello everyone!

This is my first post as a Design Team Member with Rinea!!! I am very excited for this opportunity and I hope that I will inspire you in your crafting endeavors. I am also excited about the opportunity to share with all of you the foiled papers Rinea has! The foils will make any project you create elegant and will make your projects shine (haha)! I have so many projects in my head I want to create, so I am excited about this year on the design team!

I am sharing with you today a "Father's Day" card! I am using the Rinea Foiled Paper from the newly released set called Magical Variety Pack . My card is clean and simple, but I think elegant at the same time! The foiled papers are perfect for any masculine card.

The base of my card is an A2 card, 4 1/4x 5 1/2, the foiled paper from the Magical Variety Pack measures 4 x 5 1/4.


I die cut all the elements using the Rinea foiled paper from the Magical Variety Pack. I arranged the elements on my card. I used adhesive to adhere the gold pocket, then I used foam tape to add the tie and the word dad. I heat embossed the sentiment with white embossing powder on black card stock and added foam tape and popped it up on my card.


Here is a closer look at the elements I added to my card. 


Thank you so much for stopping by, please come back again!

Supplies Used:


Made With Love By The Dutch Lady Designs
Follow Me on Pinterest