Showing posts with label summer. Show all posts

Newton's Nook Designs - Cheers to Summer

Thursday, July 9, 2026

Hello everyone!

I’m sharing a fun summer-themed card featuring Newton’s Nook Designs Happy Meowr Stamp Set! I wanted this card to have a cool coastal feel, so I paired the adorable image with papers from the Seaside Paper Pad and created a bold geometric background using Card Layout 4.

The different patterned papers come together beautifully, adding lots of interest while keeping the soft blue color palette perfect for summer. I love how the turtle, fish, and dotted patterns complement sweet Newton as he relaxes with a refreshing drink in his fishbowl—definitely living his best summer life!  

For the sentiment, I chose “Cheers to Summer!” from the Newton’s Happy Meowr Stamp Set. I heat embossed the sentiment with white embossing powder and die-cut it from the Basic Frames Die Set.

D. Idlet, Newtons Nook Designs, Happy Meowr Stamp set, Seaside Paper Pad, summer

To finish the card, I added a few sparkling sequins around Newton for a touch of shimmer and tucked in a few seashells from the Happy Meowr Stamp set to complete the beachy vibe.

Thank you for stopping by, please come back again for more inspiration!  


Newton's Nook Designs -JUNE 2022 RELEASE - REVEAL DAY 1

Monday, June 13, 2022


Hello everyone!

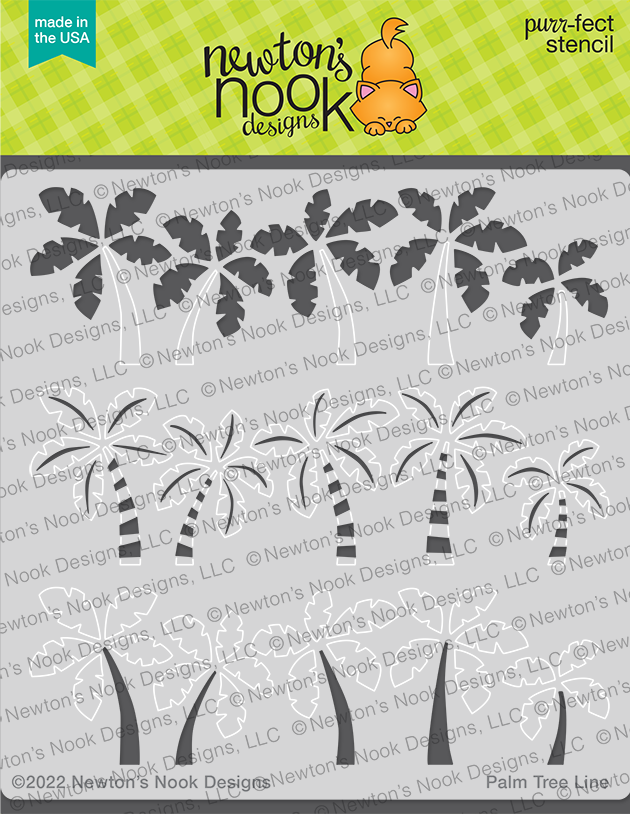
I am here with Newton's Nook Designs and today is Reveal Day 1 of the NEWLY released products that will be available on Friday, June 17th. The design team is featuring "Beach Bound" stamp set and coordinating Die set, "Summertime Paper Pad" and "Palm Tree Line Stencil". For more inspiration please visit Newton's Nook Design Blog to see what the design team has created.


Here is my card I created today for your inspiration:

Donna Idlet, Newton's Nook, Beach Bound, die cutting, summer , palm tree line stencil, Summertime Paper Pad, copic coloring, ink blending, beach, jeep, cars

Here is how I created it:
  • Mini Slimline Card Base: 3 1/2" x 6" (7" x 6", scored at 3 1/2" on the 7" side).
  • Top layer measures 3 1/4 x 5 3/4
  • Masked off about an inch from the bottom and inked blended the sand and the sky.  Used a couple of alcohol markers to add details to the sand.
  • Created the trees with the Palm Tree Line Stencil.
  • Cut the water from the Summertime paper pad.
  • Stamped, colored the images with alcohol markers and die cut the vehicles from the "Beach Bound" stamp set and die cut with the coordinating dies.
  • Stamped the sentiment from the "Beach Bound" stamp set.
  • Assembled the card.

Would you like to win the “Beach Bound” Stamp Set? This stamp set will be given away to ONE lucky winner!

Here's how to win: Comment on the NND blog and Design Team blogs (see list below)! The winner will be chosen at random from the collective reveal posts. Make sure to check out each of their blogs and comment for your chance to win. You will not know which blog has been chosen so the more you comment on the better your chances are of winning! You have until Thursday June 16th at 9pm ET to comment -- winners will be announced on the blog post on Friday June 17th.

Check out all the awesome Design Team Blogs below to enter:

Maker's Movement - Summer

Friday, May 27, 2022

Hello everyone!

I am here with The Maker’s Movement with my first post on their Design Team! I am so happy to be a design team member and to be able to share with you their wonderful products. Today I am featuring the NEW Summer Sentiments Stamp & Die Set and the Flip Flop Die Set.

Here is my card for your inspiration:


Here is how I created the card:

1. Die cut the layers from the Slimline Essentials Die Set using the Crossover II die cutting machine in Kraft card stock.  Card base measures 3 1/2 x 8.

2. Die cut the flip flops from the Flip Flop Die Set using card stock from my stash, the thongs are die cut from the Maker's Movement 6x6 paper pad called Rainbow Sprinkles. Added some enamel dots on top of the flip flops.

3. Stamped and die cut the word "Summer" from the Summer Sentiments Stamp & Die Set, the thongs were die cut using the Maker's Movement 6x6 paper pad Rainbow Sprinkles.

4. Stamped the sentiment from the Summer Sentiments Stamp & Die Set and used the flag die from the  Summer Sentiments Stamp & Die Set and adhered it to the card.

5. Assembled the card and to finish it off added some enamel dots to finish off the card.

Thank you so much for stopping by, please come back again soon!


Joy Clair Designs - Good Vibes

Friday, September 21, 2018

Hello everyone!

It's Donna here with Joy Clair Stamps and today I am here with Joy Clair featuring the newly released stamp set from the Everyday line called  "Good Vibes". I can't believe we are almost in the Fall season, this summer was a great one for me.

Here is my card:


Another look at the card


1.  My card is an A2 card, 4 1/4 x 5 1/2,
2.  I took some distress ink and used some masking tape to make the sand, masked off the sand and created the water with distress ink, then I used a cloud stencil to create the clouds,
3.  I stamped the sentiment with black ink,
4.  I stamped and used my scan and cut to cut the images from the Joy Clair Good Vibes,
5.  I then colored the images with Copics,
6.  I then took some glossy accents and put it on the ball and the window and lights of the Jeep to give them some definition (see pic below),
7.  After the glossy accents dried, I arranged the elements on my card and used some foam tape to pop the Jeep and the ball on the card.


If you have not joined the Joy Clair Challenge this month. The theme is always anything goes but our Design Team uses a photo inspiration to create their project that you can use too. If you would like to join the challenge, head over to Joy Clair for more details.  One lucky winner will have a chance to win a $25 Gift Certificate to the Joy Clair Store.

I hope you enjoyed my card as much as I enjoyed making it!  Please follow Joy Clair's facebook pageColor by Faith Bible Journaling facebook pageInstagram and Twitter, be the first to hear the news, sales and giveaways! They also have a Pinterest page and Youtube channel for your inspiration!


Retro Rubber Challenge Blog #61

Tuesday, August 1, 2017

Hello everyone!

I hope you are enjoying your summer thus far!  I can't believe it is August already, boy does the time fly when you are having fun.  I am here with Retro Rubber Challenge Blog and we have a new challenge and it is an inspiration photo which is below. 

The rules to play along with Retro Rubber are very simple, make sure the stamp you use on your project is at least one year or older.   For more details on the rules, you can find them over on Retro Rubber Challenge blog.  Be sure to stop over on the Retro Rubber Challenge blog to get more inspiration, the design team has some wonderful creations!

Here is my take on the challenge:

I am using two stamp sets from Lawn Fawn, the plaid is called "Gingham Backdrop which was released in the Spring of 2015.  The watermelons and ants are from another set by Lawn Fawn called "Happy Summer" which was released in June 2012.   I have had these stamps in my stash for quite a while so I was so happy I could use them in this challenge!  The inspiration of the red plaid table cloth in the photo really helped me create this card.  I started out with an A2 card, I stamped the plaid with Stampin Up Real Red ink and used some blue distress ink at the top.  I then stamped the ants above the plaid, stamped the watermelon with black memento ink and die cut them out and colored them with copics (R35, 46 and 59).  I added the watermelons with dimensions.  I stamped the sentiment and added it to the card.


Thanks again for stopping by, please don't forget to stop over at the Retro Rubber Challenge blog and join the fun and check out the beautiful projects the design team members have created. You have until August 11th to join in on the fun! 

Entered my card in the following challenge:

Made With Love By The Dutch Lady Designs
Follow Me on Pinterest