A Blog Named Hero

Wednesday, December 28, 2016

Hello all,

This is my first post as a Design Team Member for "A Blog Named Hero"!   I am so excited about this opportunity!  Who doesn't love Hero Arts stamps?  I know I do.  For my first post I am using  the Celebrate Tag Stamp and Cut set to introduce myself and say "Hello" to everyone.  I am no stranger to Hero Arts products.  I have been using their stamps for many years and also have been a stamper for many years. My passion is card-making, but I also love scrapbooking, traditional and digital. I also love photograph.  I so enjoy sharing my craft with others and I hope that I can/have inspired you in some way.....now onto how I put my card together:
  1. My card is an A2 card,
  2. I die cut the scalloped layer and adhered it to my card,
  3. I then die cut the stitched rectangle and embossed it and then adhered it to the scalloped piece,
  4. I die cut the tag and added the sentiment,
  5. I used foam tape to pop the tag on the rectangle embossed piece,
  6. I finished off the card by adding some rhinestones and twine.


A Blog Named Hero is giving away a $20 gift certificate to Hero Arts for one lucky person. They will draw a random winner from comments on all the design team introduction posts (you can start here), so the more you comment, the more chances you have to win!  If you haven't seen the new Valentine’s release check it out!

Thank you so much for stopping by, I hope I have inspired.  You can follow me on Instagram, TwitterPinterestFacebook and my blog. You can also find me over at Splitcoast Stampers

Supplies Used:

CottageCutz Wisdom Tree

Sunday, December 25, 2016

Merry Christmas everyone!

I hope you all are relaxed and enjoying your family and friends this holiday season!  I want to wish everyone that celebrates the Christ of Jesus, Merry Christmas.  I love being with family and I am enjoying being with my family and my grandchildren this holiday season.

I have a CAS card for you today!  I am using the Wisdom Tree die today because it says it all about the season.


Here is how I put my card together. 

1.  My card base is 4 x 5 1/2,
2.  I cut all my pieces out that I want to use on my card,


3.  I glued the wisdom tree to the white card base that I cut out using the Double Stitched Rectangle die.  I used the largest frame.
4.  I finished my card by adding some bling to my card to give it some more definition. 

Everyone seems to have an after Christmas sale, please check the CottageCutz store tomorrow, there is going to be an after Christmas sale!  You don't want to miss out if you have been looking at a certain die.

Thank you so much for stopping by, please come back again soon!

Supplies Used:


a2z Scrapbooking Challenge (anyting but a card) - Hero Arts Peace & Joy

Saturday, December 24, 2016

Hello everyone,

I am here with a2z Scrapbooking December's challenge which is "anything but a card". This has been such a challenging challenge this month. Sometimes it's difficult to come up with something other than a card.  Have you had a chance to play along? There is still time to play.  Don't forget to use at least one Hero Arts product on your creation.  You can upload your project here.  Hop on over to the a2z Scrapbooking blog and see the beautiful projects the design team has created.  You will sure to get some inspiration.

I have a gift bag to share with you today!  It's only two more days before Christmas and I will definitely be using this for someone's gift.  I am using the Hero Art's Peace and Joy wooden stamp, and the best thing about this stamp is it's on sale right now.  Hope on over to the store and get it, it's limited quantities and once it is gone, they will not be restocked.


Here is how I created my gift bag:

1.  I cut my first layer at 4 1/4 x 5 1/2,
2.  The red foil paper measures 3 7/8 x 4 7/8,
3.  The white piece that the "peace & joy" measures 3 1/2 x 4,
4.  I stamped the image in black and then copied it on a laser printer,
5.  I ran the paper through my Minc and used Red Rouge Deco Foil,
6.  I adhered all my layers and finished it off with Hero Art Rhinestones,
7.  I took some thin paper, red, green and kraft and used my scissors to curl the paper and added it to the top of the bag and put some tissue paper in it.  

If you like any of the products I used on my card, please stop over at the a2z Scrapbooking Esty store. You can also use the code "Donna15" to receive 15% off of a $25.00 order.

a2z Scrapbooking has a Twitter, Instagram and Facebook pages. Follow us on these different social media outlets so you won’t miss out on any of the promotions!

I hope I have inspired you to join the challenge this month! You will have a chance to win a $25 gift certificate to the store! Good luck and please come back again soon!

Supplies Used:


Joy Clair - Best of the Year!

Friday, December 23, 2016

Hello everyone!

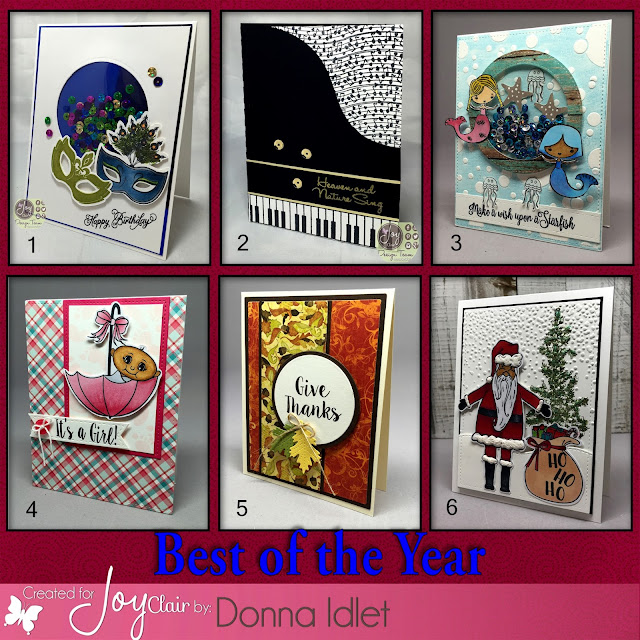
I am here with Joy Clair to showcase "The Best of the Year" cards that I have created throughout the year.  It was so hard just to pick out 6 cards, but I managed to do so.  Here they are:


I have numbered the cards so you will know what card I am talking about.

Card #1  - Is from the Mardis Gras stamp set, I made a shaker card with this one. I love this set, I think I used it a couple of times through the year. Here is the link if you would like to check out how I put it together.

Card #2 - Is from the Merry Christmas Sentiments set and the Music Makers set.  These sets where a favorite of mine too.  I used this set a couple of times too through the year.  Here are the details on this card.

Card #3 - Is from the Seas the Day stamp set.  Details are here for this card.  

Card #4 - Is another favorite of mine.  This is from the Oh Baby! set.  Details on how I put this together can be found here.

Card #5 - Is a clean and simple card, but I love the font on this sentiment.  This is from the Give Thanks stamp set, this set has all sentiments.  Details are here.

Card #6 - Is a new release from November called Holly Jolly Santa.  I really like this whimsical Santa and he was so much fun to color.  Detail are here.  

Thank you so much for stopping by and checking out my best of the year cards with Joy Clair.  Please stop by the blog and check out all the other talented designer team members best of the year!  Joy Clair stamps are wonderful to work with and the designers are so talented.  I look forward to sharing more cards with you in the future.  


Christmas Card Challenge #2 - Carolers

Sunday, December 18, 2016

I HAVE THREE POST TODAY, IF YOU ARE LOOKING FOR SO SUZY CLICK HERE.
IF YOU ARE LOOKING FOR COTTAGECUTZ CLICK HERE.

Hello everyone,

It's a new challenge over at the Christmas Card Challenges. This week it is all about carolers. I hope you all are ready for Christmas and have the Christmas music going and all the gifts wrapped under the tree.  I wish all of you many blessings during the holiday season and a Happy New Year!


I used the die from Die-Versions Sweet Petites Die-Carolers and die cut it out with black paper, The background is some paper I had in my stash, I thought would go perfect with the layout of my card. The lamp post is from Tim Holtz Holiday Lamppost.  The sentiment is from the Poppystamps Christmas Greetings.


.Thank you so much for stopping by, please hop on over to the Christmas Card Challenge and join in on the fun and to see the other design team projects.


So Suzy - December Guest Designer Ornaments!

Sunday, December 18, 2016

I HAVE THREE POST TODAY, IF YOU ARE LOOKING FOR THE CHRISTMAS CARD CHALLENGE CLICK HERE.
IF YOU ARE LOOKING FOR COTTAGECUTZ CLICK HERE.


Hello everyone!

This is my last post this month as the guest designer for So Suzy Stamps.  I  have had a wonderful time using So Suzy's products!  You will definitely see her products again on my blog.  If you have not tried them before, hop on over to her store and see what my inspire you to create something.  

Now onto my card, I am showcasing the bulb ornaments that were released last month.  They are called "Ornaments Large Swirl and Round Bulbs and Swirl Bulb Small".  There are other bulbs that were released, they are all gorgeous!  I hope you have the opportunity to stop over at So Suzy's blog to see all the creative projects made by the Design Team.   

Here is how I put my card together:
  1. My card is an A2 Card, 4 1/4 x 5,
  2. I die cut a piece of cardstock out to fit an A2 card,
  3. I then embossed the cardsotck,
  4. I stamped the So Suzy Ornaments, and colored with copics,
  5. Added some stickles, 
  6. I added some twine to the card and popped the ornaments on the card, 
  7. I finished my card by adding the sentiment.

Thank you again for stopping by, please come back again soon!

Supplies Used:


CottageCutz - Hello

Sunday, December 18, 2016

I HAVE THREE POST TODAY, IF YOU ARE LOOKING FOR SO SUZY CLICK HERE.
IF YOU ARE LOOKING FOR THE CHRISTMAS CHALLENGE CLICK HERE.

Hello everyone!

I am here with Cottagecutz and decided to change it up a little and show you this cute critter that was released in October.  The release was called "In the Forest" in case you missed it. There are so many adorable critters,there are fox, rabbits, dogs, you name it, go and check them out if you missed them

Here is my card, I am featuring the raccoon from the Forest Peekers, Fox & Raccoon set.  This set comes with the fox and the raccoon.  There are also a couple of positions you can create the critters peaking out...there are so many possibilities.


Here is how I put my card together:

1.  I die cut all my pieces,
2.  The raccoon I die cut him out with white cardstock and then colored him with copics,
3.  I die cut the stump from the Tree Stump & Log for Peekers
4.  I glued the pieces together and assembled my card.
5.  I finished my card off by adding the "Hello" from the Hello Spring set.


DIES USED:


Thank you so much for stopping by, please come back again soon!


Prickley Pear - Coffee Cup Set

Wednesday, December 14, 2016


Hello everyone,

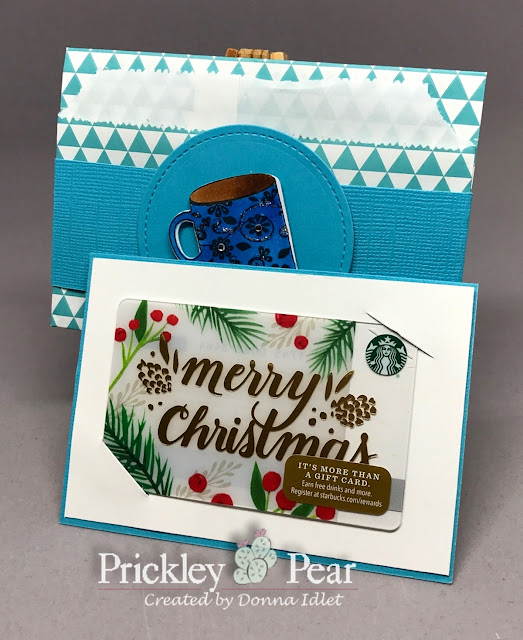
I am here with Prickley Pear showcasing the Coffee Set, I love this set it is so versatile and can be used in so many different ways!  I have made a couple of Christmas gift card sets.  These are perfect for this time of year to give to co-workers, teachers, your good friends who love to drink coffee!!!!  I am entering these into the Winter Coffee Loving Blog Hop!  In case you did not know the theme is "Christmas".  Prickley Pear is a "Super Sponsor"  you have the opportunity to win lots of prizes, Prickley Pear is giving two – clear stamp sets with matching dies....so don't miss out, hop on over to Prickley Pear and see all the beautiful creations the design team has created and leave them some "comment love" to tell them how much you like their projects.


These gift card holders are made from small bags, I folded them over and made a belly ban and added my card inside. I made a couple of slots on the card to hold the gift card. The cups are from the Coffee Cup Clear Set, Coffee Cup Die Set,

This side of the gift card is holding the gift card.


Here on this side of the card, you can write a note. The banner and sentiment is from the Christmas Banner Clear Set and Banner Die Set

On this gift card hold, you can write a note. The banner and sentiment is from the Christmas Banner Clear Set and Banner Die Set

gift card holder

Thank you so much for stopping by, please come back again soon!

Gina K Designs - Day 2: Beth Silaika Xavier Zebra and Claire Brennan Half Pint Heroes and Half Pint Heroines

Tuesday, December 13, 2016

I HAVE TWO POST TODAY, IF YOU ARE LOOKING FOR RETARTE, CLICK HERE


The Cast and Crew for Gina K Designs welcomes you to another fabulous blog hop celebrating the new stamp release for December by our illustrator team! We hope to inspire you with some beautiful card projects as you hop along to each of the designer’s blogs! Today, we are featuring  Beth Silaika set Xavier Zebra and Claire Brennan's two sets Half Pint Heroines and Half Pint Heroes.  These stamp sets are so fun and versatile! You will be able to create amazing card projects using each individual set or by combining the images and sentiments from multiple sets from this release. Have fun and be creative!


Half Pint Heroes by Claire Brennan


Half Pint Heroines by Claire Brennan


Xavier Zebra by Beth Silaika 


Enjoy the gorgeous inspiration samples from the team and then comment on each blog for your chance to win a $20 Gina K Designs gift certificate! To see who won, check the Big News Forum at StampTV a few days after the hop. Ready for some inspiration? Here are a few of the projects I have created for today’s hop:

GKD Supplies Used:
Stamps: Half Pint Heros (Claire Brennan)
Ink: Memento Tuxedo Black & GKD Black Onyx and Grass Green, distress inks and Copics
Paper: Pure Luxury Card Stock in White and Navy
Embossing Folder: Tim Holtz Waves and Bubbles
Glossy Accents

GKD Supplies Used:
Stamps: Half Pint Heroines (Claire Brennan)
Ink: GKD Black Onyx and Copics
Paper: Pure Luxury Card Stock in White and Ocean Mist

GKD Supplies Used:
Stamps:  Xavier Zebra by Beth Silaika 
Ink: GKD Black Onyx and Copics
Paper: Pure Luxury Card Stock in White and Tim Holtz Distress Watercolor paper
Clear Sequins

In case you missed these two cards from the StampTV party last week here they are. The first card is from the Half Pint Heroes by Claire Brennan and the second card is from the Xavier Zebra stamp set by Beth Silaika.


GKD Supplies Used:
Stamps: Half Pint Heros (Claire Brennan)
Ink: Copics and GKD Black Onyx
Embossing Powder: GKD White
Paper: Pure Luxury Card Stock Navy and White
Taylored Expressions: starry night cutting plate

GKD Supplies Used:
Stamps: Xavier Zebra (Beth Silaika)
Ink: Copics, GKD Black Onyx
Paper: Pure Luxury Layering Weight Card Stock in White and Black

Ready for more awesome creations?! Just click on the links below for more from Gina and the Cast & Crew:


Don’t forget to pop over to the Gina K Designs Store and check out all of the new products available this month in the “What’s New” section at http://www.ginakdesigns.com.

Thank you for stopping by!


Made With Love By The Dutch Lady Designs
Follow Me on Pinterest