GINA K. DESIGNS AUGUST INSPIRATION BLOG HOP - DAY 2

Tuesday, August 30, 2016

Hello everyone!

The Cast and Crew for Gina K Designs welcomes you to another fabulous blog hop celebrating the new Painted Autumn StampTV Kit! We hope to inspire you with some beautiful card projects as you hop along to each of the designer’s blogs! Today, we are featuring the second set in the Painted Autumn StampTV Kit.  

Today’s set, we are featuring Give Thanks. In this set, you will find fun and cuddly critters, acorn, leaves and fun sentiments to make the most adorable card projects!  There are so many possibilities with these sets!


Enjoy the gorgeous inspiration samples from the team and then comment on each blog for your chance to win a $20 Gina K Designs gift certificate! To see who won, check the Big News Forum at StampTV a few days after the hop.

I was very excited when I saw this stamp set, there are so many possibilities! For this card, I embossed a woodgrain on the background. I die cut the cute squirrel and the acorn out with the ivory paper, I then colored them both with copics. I finished the card with the stamp "happy fall".
 

 Supplies:
Pure Luxury Card Stock:  Ivory
Pure Luxury Layering Weight Card Stock: Dark Chocolate and Honey Mustard
GKD Give Thanks die set
GKD Color Ink: Black Onyx
Copics:  E31, E35 and E57

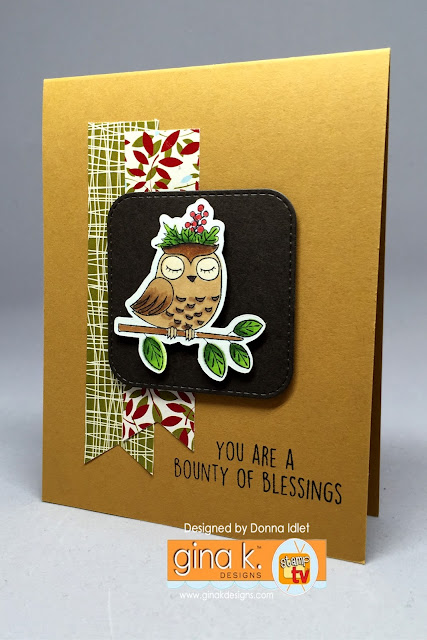
 For this card, I used two different patterns from the Give Thanks Pattern Paper, I die cut the owl and colored him with copics.  Very CAS card, but isn't this owl so cute.  Love this set.


 Supplies:
Pure Luxury Card Stock:  Ivory
Pure Luxury Layering Weight Card Stock: Dark Chocolate and Honey Mustard
GKD Give Thanks die set
GKD Color Ink: Black Onyx
Copics:  E35, E57, E79, R59, YG03, YG17 and Y67

My last card, I stamped the first set of pumpkins with versamark ink and embossed it with gold embossing powder, then I masked the first set and stamp the the first two pumpkins with versamark and embossed them.  I colored them with copics and finished my card with the sentiment from the Give Thanks set.
 

Pure Luxury Card Stock:  Ivory
Pure Luxury Layering Weight Card Stock: Red Velvet and Honey Mustard
Gold embossing powder
Inkadinkado masking paper
Copics:  Y17, Y38 and Y68

Ready for more awesome creations?! Just click on the links below for more from Gina and the Cast & Crew:


Don’t forget to pop over to the Gina K Designs Store and check out all of the new products available this month in the “What’s New” section at http://www.ginakdesigns.com.

Thank you for stopping by!

Retro Rubber Challenge #46 - It's Critter Time!

Tuesday, August 30, 2016

Hello everyone,

I am here with Retro Rubber Challenge blog and we have a new challenge, it is "it's critter time" you can use the photo below for inspiration. To join the challenge, simply use a stamp one year old or older, tell us how old it is and follow the theme.  It's so much fun to join Retro Rubber's challenges. Don't forget to stop by the blog and see all the other design teams creations.


On my card I am using the Lawn Fawn set Wheelie Like You" which was released in the Spring of 2015. My card is clean and simple. I stamped and die cut the images and colored with copics. I added some design paper to an A2 card, splattered with some black ink and popped the images in the center of the card.


I hope you have been inspired by my card and will join the challenge. You have until September 9th to hop on over to Retro Rubber to join the challenge. Remember to use a stamp over a year old and make sure you tell us how old it is. I cannot wait to see your creation! Leave me a comment to tell me how you liked my card, I love to read them. Thanks for stopping by, come back again soon!!

Supplies Used:


GINA K. DESIGNS AUGUST INSPIRATION BLOG HOP - DAY 1

Monday, August 29, 2016

Hello everyone!

The Cast and Crew for Gina K Designs welcomes you to another fabulous blog hop celebrating the new Painted Autumn StampTV Kit! We hope to inspire you with some beautiful card projects as you hop along to each of the designer’s blogs! Today, we are featuring one of the stamp sets from the kit.

Today’s set, we are featuring Painted Autumn. In this set, you will find beautiful floral and leaf images where you will be able to create the 3 or 4-step stamping technique! You can create one floral image or an entire bouquet of gorgeous autumn flowers. This set will be great to use all year long!


Enjoy the gorgeous inspiration samples from the team and then comment on each blog for your chance to win a $20 Gina K Designs gift certificate! To see who won, check the Big News Forum at StampTV a few days after the hop.

My first project is a clean and simple card with the Painted Autumn set.  I used the sentiment "give thanks" and I used my favorite pattern paper from the Give Thanks pattern paper pack.  I finished off my card by using the Gina K designs Flutterby die.


 Supplies:
Pure Luxury Card Stock: White
Pure Luxury Layering Weight Card Stock: Asparagus, Red Velvet
GKD Color Ink: Black Onyx

My next project I am using the layering flowers.  I love how the flowers turned out. Gina has made a tutorial on how to layer the flowers and leaves which will really help you to make them.  I posted the flower tutorial below the card.  I fuzzy cut the flowers out and popped them up on my card.


Supplies:
Pure Luxury Card Stock: White
Pure Luxury Layering Weight Card Stock:  Sweet Corn, black onyx
GKD Color Ink: Black Onyx


Ready for more awesome creations?! Just click on the links below for more from Gina and the Cast & Crew:

Gina K
Beth Silaika
Cathy Tidwell
Claire Brennan
Donna Idlet - YOU ARE HERE
Karen Hightower
Kendra Wietstock
Laurie Schmidlin
Melanie Muenchinger
Sean Fetterman
Sheri Gilson
Silke Ledlow
Susie Moore
Theresa Momber

Don’t forget to pop over to the Gina K Designs Store and check out all of the new products available this month in the “What’s New” section at http://www.ginakdesigns.com.

Thank you for stopping by!

Joy Clair Butterfly Wishes - Thinking of You

Thursday, August 25, 2016

Hello everyone,

It's Donna here, have you been celebrating all month with Joy Clair one year anniversary? Have you purchased any of the $10.00 sets from their first releases from August 2015?  You still have time, hop on over to the store and get some of these wonderful stamp sets.  Here is an image of the sets and you can find all of these in the Joy Clair store.


On to my card for today, I am featuring the Butterfly Kisses stamp set which was released this month.  This stamp has so beautiful butterflies that you can use on your project for all kinds of occasions.  The sentiments in the set are very nice!  I love the script and looks beautiful on any card.  My card is clean and simple. I stamped the butterfly three times, stamping over the edge of my card with the first and last.  I stamped the middle butterfly again and fuzzy cut it out and popped it up on the card.  I colored them with wink of stella markers.  In the second picture, I tried to take a picture closer to show the shimmer.  I finished the card off by adding some twine from my stash.  


There is still time to play along with the Joy Clair August challenge - the theme is Inspirational/Color challenge and you have until August 31!

Please follow Joy Clair's facebook pageColor by Faith Bible Journaling facebook pageInstagram and Twitter, be the first to hear the news, sales and giveaways! They also have a Pinterest page and Youtube channel for your inspiration!

Thank you for stopping by and please come back again soon!

CottageCutz - Merry Christmas Brag Book

Thursday, August 25, 2016

Hello everyone,

I am here with the Scrappin Cottage blog today with another fabulous project using the new Christmas release.  This is a brag book or mini album that would be perfect for someone's grandparents or anyone you want to show off some pictures of your loved ones.

On the front cover this is the new Merry Christmas Ribbon.  I die cut it out with glossy red paper and green and replaced the red letters with the green and now I have the ribbon in green to use on another project.


I found this tutorial on Youtube, here is the link.  I made just one change, which I will try and show you with my diagram below.  The mini is constructed with one piece of 12 x 12 paper!  Here are the score lines that you will start with.


Here is what the mini looks like folded, it measures 5 x 4:


Here are pictures and instructions on decorating the inside of the mini:

The first pages you lift the flap, I used the Mail Tag Set to make some tags for the book.  These can be used for journaling or you can add pictures to them.  This mini can hold lots of pictures.  The background paper measures 3 1/2 x 3 1/2.  The bottom pieces measures 1 1/4 x 3 1/2.


The next set of papers measure 4 7/8 x 4.  The beautiful ornaments are from the new release Ornament Trio.

This flap is lifted up from the "joy" page and this is another photo mat or journaling page.  The white background 4 7/8 x 4.  The Believe is from the Believe w/ Holly Flourish, I only used the word.

The next page has a pocket that I added two journaling or photo mats.  The Joy is from the Ornament Trio.   The next page has a small pocket and I added the card from the Merry Christmas Notecard. The card you can add a couple of pictures inside or again journal something inside.

This is the back side of the mini.  You can get to the two journaling cards from this side too.

Here is a closer look at the Merry Christmas Notecard.  If you don't want to use this as a journaling card you can also make this into a Christmas card or a gift tag.  This notecard has so many possibilities.

So, what do you think?  Do you like the brag book!  I so enjoyed making this.  I hope you have been inspired to start making one for yourself. Please stop by and join the challenge, this months theme is birthday you still have about 7 days.

Thank you so much for stopping by, please come back and visit again soon!

Dies Used:


a2z Scrapbooking - Color It In Challenge

Wednesday, August 24, 2016

Hello everyone,

I am back again with a2z Scrapbooking challenge which is “Color It In”! You have to use at least one Hero Arts image on your card that you can color in. Please go to the a2z blog and see what the talented design team has created. You can also add your project to the inlinkz here.  There is only about a week to play along!

I am using the Color Layering Flamingo stamp set and die.  I love this set it is so adorable.  I distressed my background to look like the sunset and water below.  I added the greenery in two different colors Moss and Pine by Hero Arts.

I stamped the flamingo's in Hero Arts ink Soft Pink, Bubble Gum and Ultra Pink.  I die cut them out and cut the feet off, because I stamped them right to the card.  I popped them up on the card.  I finished off the card by adding the sentiment.


Thanks for stopping by, I hope I have inspired you to join the a2z Scrapbooking challenge this month. For more details on the challenge, you can find it here. Please make sure your project uses at least one Hero Arts product. If you are in need any of the items I used or any Hero Arts products please visit the a2z Scrapbooking store you can use coupon code "Donna15" at checkout to receive 15% off your purchase of $25 or more before tax and shipping). This stamp set is sold out, but on the left side of the store, you can put a special order in for this.

Don’t forget we are on Twitter, Instagram and Facebook. Follow us on these different social media outlets so you won’t miss out on any of the promotions!

I entered this card into the Curtain Call Challenge, flamingos.

Supplies Used: 


Doodle Pantry with Retarte Challenge #84 - Anything Goes

Tuesday, August 23, 2016

Hello everyone,

This is my first post for the Retarte Challenge blog as a design team member.  Thank you so much Martha for inviting me to join your team.  If you never have joined one of their challenges, please do, it's always "anything goes"!  Today I am featuring one of the digital images from Doodle Pantry and my image is called Jiggles Giraffe.  There are 14 papers, 3 sentiments, some bows and the giraffe to choose from!  Wonderful set!

I cut the giraffe out using my Silhouette and colored him with copics.  If you have never stopped in to see the very nice digital designs from Doodle Pantry you may want to stop over and check them out!


Closer look at the layering.

How I made my card:

1.  A2 card (4 /14 x 5 1/2)
2.  Before printing the papers out, I added the sentiment to the orange paper, 
3.  I printed the orange and brown papers from the digital file,
4.  Cut the brown at 4 x 5 1/4,
5.  Cut the orange 3 7/8 x 5,
6.  I imported the digital file into my silhouette,
7.  Traced the image,
8, Cut the image out twice,
9.  Colored with copics,
10, Layered the giraff (see pic),
11.  Added some enamel dots to finish my card.

Thank you so much for stopping by, I hope you will join the challenge.  

Curtain Call Inspiration Challenge-Flamingo

Friday, August 19, 2016

Hello everyone,

I am stopping in to join the Curtain Call Inspiration Challenge-Flamingo.  I haven't played along with them in a while and saw what the challenge was and just had to join.  I have several flamingo stamps, but I chose to use the Pink & Main stamp set called "Ticked Pink".


I stamped the flamingo twice and fuzzy cut it out.  I popped the feather up to give her some dimension.  I colored everything with copics.  Don't you love the paper, do you see the flamingo's on it.?  I love how the black and pink look so well together.


Thank you so much for stopping by, Please come back again soon!


Supplies used:


Made With Love By The Dutch Lady Designs
Follow Me on Pinterest