Pages

Tuesday, October 31, 2023

Newton's Nook Designs - October 2023 New Release Inspiration Day 1!


Hello everyone!
I am here with Newtons Nook Designs, featuring products from the new release! Today I am featuring the " Holiday Elements Stamp Set" pairing it with the Labels Hot Foil & Die Sets that was released last month. I am also featuring the "Christmas Tress Hot Foil Plates" and the coordinating Die and "Holiday Greetings Hot Foil Plates" pairing it with the "Banner Duo Die Set"  . ALL products are available NOW. If you have not seen all the new release here and if you have hot seen ALL the hot foil plates, you can find them here.


There's so much happening at Newton's Nook Designs, they are having a sale through November 3, here are the details, the more you spend the more you save!


Also, there is a blog hop over on Newton's Nook Designs blog, click here for all the details!  
 
Here are my cards for your inspiration:

Donna Idlet, Newton's Nook Designs, Holiday Elements Stamp Set, Jar Hot Foil Plate, Labels Hot Foil Plate, Christmas Tree Hot Foil Plates, Scandi Christmas Stamp Set, Holiday Greetings Hot Foil Plates

I created some cute tags that is perfect for the baked goods you want to give for Christmas. I first foiled the Jar Hot Foil Plate and then die cut with the coordinating die. I then stamped and heat embossed the images using the NEWLY released Holiday Elements Stamp Set onto the Labels Hot Foil Plates which was foiled to coordinate with the jar, and die cut with the coordinating die.


I finished off the tags by stamping the to/from from the Holiday Elements Stamp Set  and adding the twine from my stash.

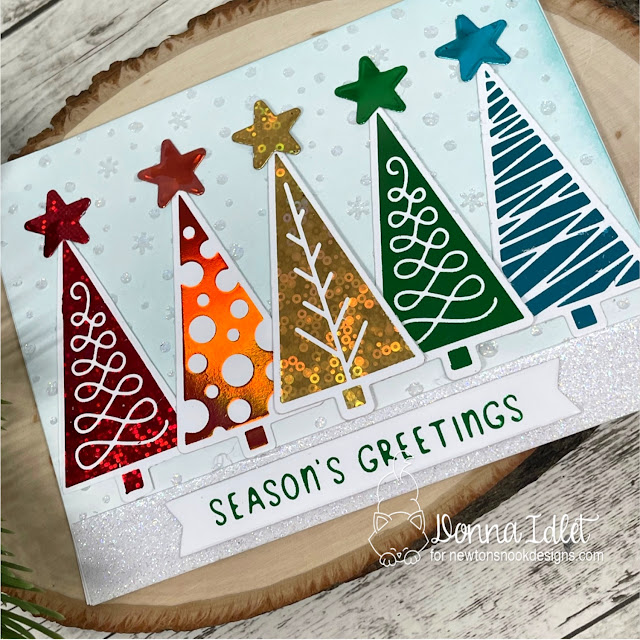
My second card I am using the NEW Christmas Tree Hot Foil Plates.

Donna Idlet, Newton's Nook Designs, Holiday Elements Stamp Set, Jar Hot Foil Plate, Labels Hot Foil Plate, Christmas Tree Hot Foil Plates, Scandi Christmas Stamp Set, Holiday Greetings Hot Foil Plates

I created my card using the NEW Christmas Tree Hot Foil Plates, I foiled the trees using rainbow color foils. I die cut the trees using the coordinating die. I foiled the greeting with green foil using the Holiday Greetings Hot Foil Plates and die cut it using the Banner Duo Die Set.
  
Donna Idlet, Newton's Nook Designs, Holiday Elements Stamp Set, Jar Hot Foil Plate, Labels Hot Foil Plate, Christmas Tree Hot Foil Plates, Scandi Christmas Stamp Set, Holiday Greetings Hot Foil Plates

I finished the card off by using the Star Die from the Scandi Christmas Stamp set to die cut the stars. The background I used the Petite Snow Stencil using irredesent glitz glitter gel.

Thank you so much for stopping by,please come back again tomorrow for more inspiration from the new release.


Monday, October 30, 2023

Newton's Nook Designs - October 2023 Holiday Release Blog Hop!


Hello everyone!

The Newton's Nook Designs Team is hopping along today with Inspiration using the BRAND-NEW Holiday Products! Make sure you scroll down to the bottom of this post to see the whole list and hop along and comment for a chance to win! You can find the NEW Release here; everything is available NOW! Be sure to come back all week for lots of inspiration.  


Also, Newton's Nook Designs is having a sale!  


Here is my card for your inspiration:

  • My card is an A2 card. 
  • The top layer, I hot foiled it using the NEWLY released Holiday Foliage Hot Plate. I then cut the panel using NND Frames & Flags Die Set. I ink blended the background so the gold would pop off the page.
  • I then stamped the image with versamark using gold embossing powder to emboss the reindeer from the Scandi Christmas Stamp Set. I then die cut the image with the coordinating die from the Scandi Christmas Die Set.
  • I then die cut a piece of vellum using the NND Circle Frames Die Set.
  • I hot foiled the sentiment using the Holiday Greetings Hot Foil Plates, I used the negative of the greeting. I then die cut the sentiment using the Banner Duo Die Set.  
  • I assembled the card and for finishing touches I added some gold pearls from my stash.
I love how this card turned out, the gold foil makes the leaves look so rich in color!

What's a hop without prizes! There will be two $25 store credits up for grabs to the Newton's Nook Designs online shop. To enter, just leave comments on the Design Team Member blogs (see list below)! Two winners will be chosen at random from the collective blogs in the blog hop. Make sure to check out each of their blogs and comment for your chance to win. You will not know which blog has been chosen so the more you comment on the better your chances are of winning! You have until Thursday, November 2nd at 9 pm ET to comment -- winners will be announced on the NND blog on Saturday, November 4th.


Wednesday, October 25, 2023

Newton's Nook Designs - Holiday Home

Hello everyone!

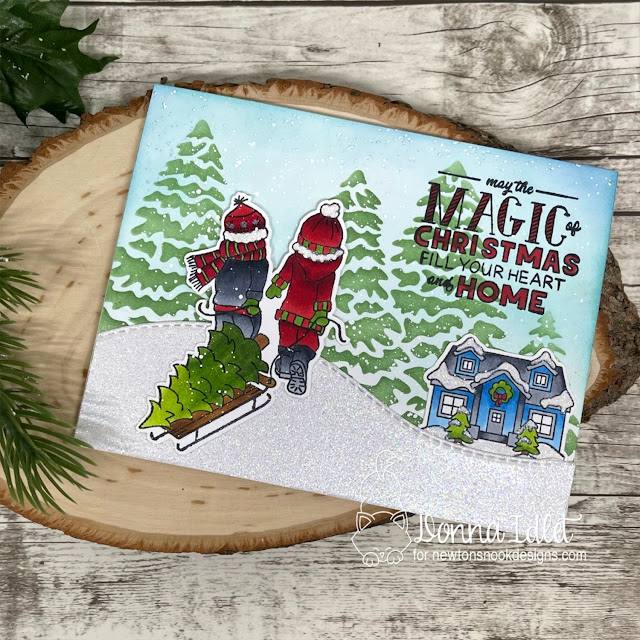
I am here with Newton's Nook Designs featuring the Holiday Home Stamp Set. This set is a perfect set to create for your holiday card this season.  I love how the two people are heading to their house for the holidays.  I am also using the Evergreen Stencil in the background.  

Here is my card for your inspiration:

Donna Idlet, Newtons Nook Designs, Holiday Homes Stamp Set,  Evergreen Stencil, alcohol markers, Christmas Card,

My card is an A2 size card. I stamped the images from the Holiday Homes Stamp Set and colored them. with alcohol markers. I cut a piece of white card stock and ink blended the background with light blue ink.  I then ink blended the trees with the Evergreen Stencil.  I stamped the sentiment and colored it with a red alcohol marker.  I die cut the snowbank from the Lands Border Die set with glitter paper from my stash.  

Donna Idlet, Newtons Nook Designs, Holiday Homes Stamp Set,  Evergreen Stencil, alcohol markers, Christmas Card,

I assembled the card, and for finishing touches, I added some snow using white pigment ink that I splattered onto the card.  I also used some fine glitter onto the house.

Thank you so much for stopping by, please come back again soon!


Tuesday, October 24, 2023

GINA K. DESIGNS - OCTOBER 2023 NEW RELEASE

The Gina K. Designs October 2023 Release is NOW available and can be found HERE.


Hello everyone!

I am here today featuring the NEW Gina K. Designs "Fun Frame" stamp set illustrated by Bethann Erin Silaika! and the "Say It All Sentiments" stamp sets illustrated by Hannah Schroepfer Drapinski. I am also featuring the Fancy Floral Layering Stencil Bundle. You can also find lots of inspiration over at Gina K. Designs & StampTV Friends Facebook page. All supplies I used are listed below.


Here are my cards for your inspiration:


I am using the Fun Frame Stamp set and the Say It All Sentiments Stamp set to create these two cards.  The first one with the cupcakes, I used the wreath builder to create the card.  I die cut the set using GKD Master Layouts 3 to die cut the layers.  The second card, I used the Poly-Glaze Celebrate to create the card.  I used GKD Fancy Foils Radiant Red to foil the sheet.  I used the sentiment from the Fun Frame Stamp Set.  The inside sentiment came from the Say It All Sentiments Stamp Set.  I die cut the layers using Master Layouts 1.  The supplies I used are listed below.


This card, I stamped the ladybugs and the sentiment from the Fun Frames Stamp set.  The layers were die cut using GKD Master Layouts 2.  The circles were die cut from Master Layouts 3.


My last card was created using the Fancy Floral Layering Stencil Bundle.  The layers were die cut from Master Layouts 13.  This is a fun fold card.  You can find all the details on GKD Youtube.

Thank you so much for stopping by!  Please come back again soon.

Here is a list of supplies I used on my cards. Affiliate Links used at no additional cost. Thank you for your support.

Retro Rubber Challenge Blog - Color Challenge

Hello everyone!

I am here with Retro Rubber Challenge blog and we have a new challenge, which is a "color" challenge.  You are to use three of these five colors:  yellow, green, brown, blue or white on your card.  Be sure to stop over on the Retro Rubber Challenge blog to get more inspiration, the design team has some wonderful creations!

The rules to play along with Retro Rubber Challenge is very simple, make sure the stamp you use on your project is at least one year or older. For more details on the rules, you can find them over on Retro Rubber Challenge blog.


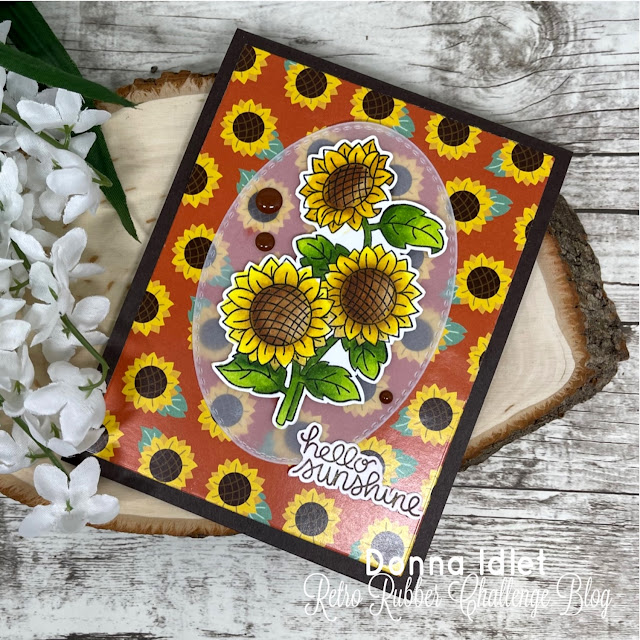
Here is my card for your inspiration. It is an A2 card. The challenge is a "color" challenge, I used yellow, green, and brown on my card.  I used some Newton's Nook Designs paper called Autumn Paper Pad for the background   I then stamped and colored the image with alcohol markers, die cut the image and adhered it to a piece of vellum I cut using an oval die.  I stamped and fuzzy cut the sentiment and adhered it to the card. I finished the card off by adding some brown enamel dots.

The stamp and die set are from Newton's Nook Designs is called Sunflower Days Stamp Set which has a coordinating die set Sunflower Days Die Set that was released in September 2019.

Donna Idlet, Newton's Nook Designs,  Sunflower Days,  alcohol marker,  Retro Rubber Challenge Blog, color challenge

Are you ready to play along? Be sure to stop over on the Retro Rubber Challenge blog to get some more inspiration! Thank you for stopping by, you have until November 3rd to join the fun!

Thank you for stopping by, please come back again soon.

Tuesday, October 17, 2023

GINA K. DESIGNS AND THERMOWEB - Penguin Pals Kit

Hello everyone!

I am here with Gina K. Designs featuring the newly released "Penguin Pals Kit".  This kit is so adorable, it comes with a stamp set, a stencil and dies to create the penguin, and many die to help you create your project.  This is a one-time deal, once the kit is sold out it will not be available, so get it while you can.  The set is only available on ThermOWeb's website.  

I have created two cards for your inspiration:

Donna Idlet, Gina K. Designs, Thermoweb,  Penguin Pals Kit, ink blending, penguins, fancy foil,  Deco Foil Flock,  die cutting, Duo gel,

My first card is an A2 card (4 1/4 x 5 1/2), I used the GKD Master Layouts 1 to die cut the layers.  

I ink blended the background using GKD inks (Wild Lilac, with a little black on the edges) and used some white pigment ink to splatter the background.  

I die cut the snow hills using GKD Master Layouts 6.  I ink blended the hills using GKD ink Sea Glass.

I die cut the cut penguins using Deco Flock in black (for the body), white (for the body), orange glow (for the feet, beak, scarf and earmuff), think pink (for the scarf and bow), and purple punch (scarf and earmuff).  

The tree I die cut using GKD Fancy Foil Glittering Green using solid black toner paper.

I stamped the sentiment using the stamp set, which I heat embossed with clear embossing powder.

Assembled the card.

Donna Idlet, Gina K. Designs, Thermoweb,  Penguin Pals Kit, ink blending, penguins, fancy foil,  Deco Foil Flock,  die cutting, Duo gel,

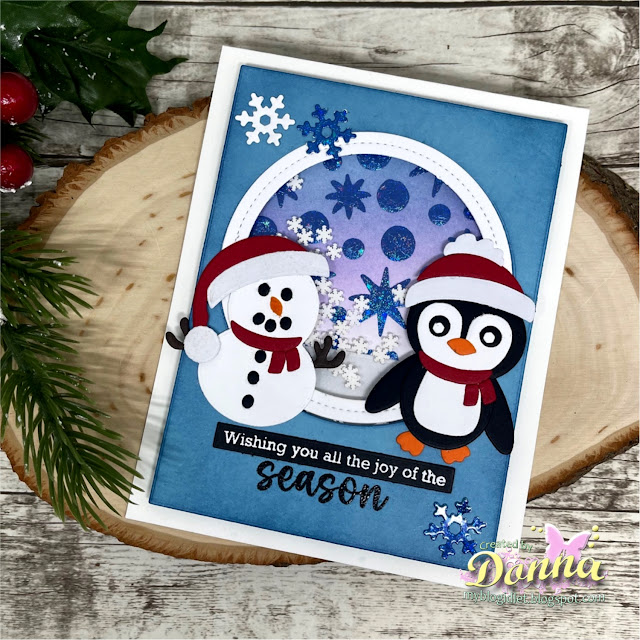
My next card, I created an A2 shaker card. I cut the top panel at 4 x 5 1/4, I die cut the circle using GKD Circle Shadow Shakers die cuts.  

I inked blended the layer with GKD Sea Glass and Navy ink.  

I then die cut a circle in the center.  I  stenciled the background using the snowflake stencil from the kit with the Deco Foil Transfer Duo Gel.  After the Transfer Duo Gel dried, I added Fancy Foil Brilliant Blue foil to the circle and ran it through my minc.  I have the Fuse Foiling System on order!  I can't wait to get it Thursday!

I added some acetate in the back of the top layer, added GKD Double-sided Adhesive Foam Shaker Strips to the back layer of the panel, added some GKD Mini Snowflakes and attached the foiled circle to the panel, and finished the card off by adding the stitched circle die to the card.

I made a snowman from the body of the penguin and assembled the penguin.  I added these to the card panel.  

Stamped the sentiment and finished the card off by adding some snowflakes.   


Thank you so much for stopping by, I hope you have been inspired and will join the hop.


Here are the supplies I used for this card. Affiliate Links used at no cost to you.

Tuesday, October 10, 2023

Retro Rubber Challenge Blog - Anything Goes

Hello everyone!

I am here with Retro Rubber Challenge blog and we have a new challenge, which is "Anything Goes". Be sure to stop over on the Retro Rubber Challenge blog to get more inspiration, the design team has some wonderful creations!

The rules to play along with Retro Rubber Challenge is very simple, make sure the stamp you use on your project is at least one year or older. For more details on the rules, you can find them over on Retro Rubber Challenge blog.


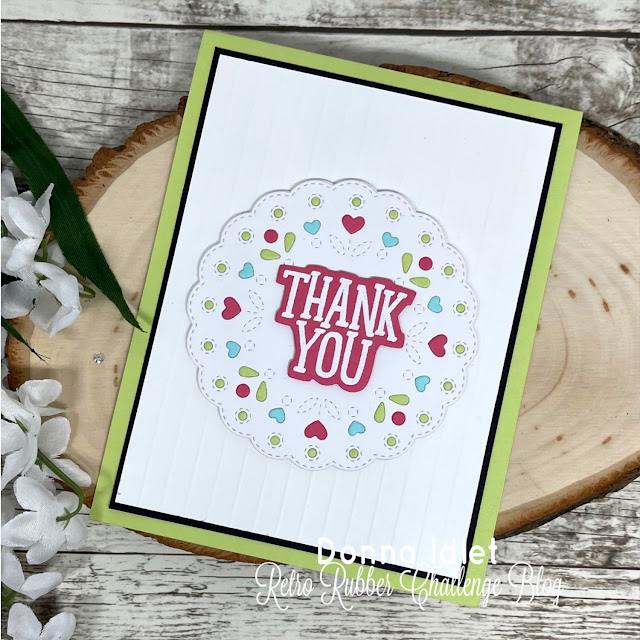
Here is my card for your inspiration. It is an A2 card.  I created the background scoring lines a  quarter inch apart.  I die cut the center a few times from different papers in my stash to inlay the colored pieces.  I stamped the sentiment and heat embossed it with white embossing powder and die cut the sentiment with the coordinating die.  The stamp and die set is Concord & 9th called Grateful Blooms Stamp Set which has a coordinating die set Grateful Blooms Dies that was released in October 2021.

Donna Idlet, Retro Rubber Challenge Blog, Concord & 9th, Grateful Booms Stamp Set, Grateful Blooms Dies, thank you card

Are you ready to play along? Be sure to stop over on the Retro Rubber Challenge blog to get some more inspiration! Thank you for stopping by, you have until May 19th to join the fun!

Thank you for stopping by, please come back again soon.

Wednesday, October 4, 2023

Newton's Nook Designs - Happy Halloween!

Hello everyone!

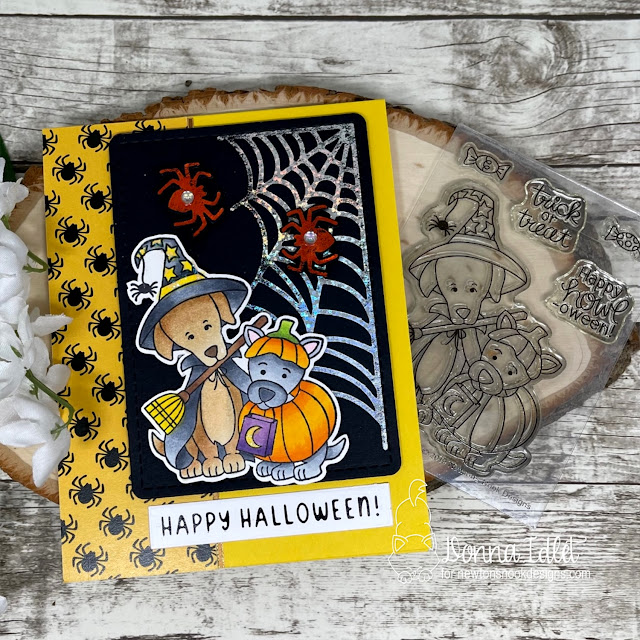
I am here with Newton's Nook Designs featuring the Happy Howl-oween Stamp Set. I am also using the newly released Spooky Sentiments Hot Foil PlatesSpiderweb Hot Foil PlatesHalloween Time Paper Pad.

Here is my card for your inspiration:

Donna Idlet, Howl-oween stamp set, Spooky Sentiments Hot Foil Plates, Spiderweb Hot Foil Plates, Halloween Time Paper Pad, Halloween card,

My card is an A2 size card. I stamped the image from the Howl-oween Stamp Set and colored it with alcohol markers. I then die cut the black layer using the Frames and Flags Die Set. I hot foiled the spiderweb from the Spiderweb Hot Foil Plates onto the black layer. I also foiled the spiders from the Spiderweb Hot Foil Plates. I foiled the sentiment using the Spooky Sentiments Hot Foil Plates and die cut it with the Banner Duo Die Set. I added the spider paper from the Halloween Time Paper Pad and then assembled the card.
 
Donna Idlet, Howl-oween stamp set, Spooky Sentiments Hot Foil Plates, Spiderweb Hot Foil Plates, Halloween Time Paper Pad, Halloween card,

Here is a closer look at the card.  For finishing touches, I added some rhinestones on the back of the spiders.

Thank you so much for stopping by, please come back again soon!