Pages

Thursday, June 21, 2018

Joy Clair - The Potter

Hello everyone!

I am here with Joy Clair and the whole month of June we are collaborating with Imagine!  I was so excited to be collaborating with them and have the opportunity to work with their products! 

I am featuring the Joy Clair stamp set from the Bible Journaling line called "The Potter".  This stamp set is sooooo nice!  The design team has made some wonderful cards and bible journaling pages, please be sure to check them out over on the Joy Clair blog. 

Here is my card:

Closer look at the card.


Here is how I put my card together:

1.  My card is an A2 card, 4 1/4 x 5 1/2,
2.  The next layer I die cut it with a stitched die, measuring 4 x 5 1/4,
3.  I stamped the Joy Clair Broken Brick background stamp with the Imagine Emboss and heat embossed it with white embossing powder,


4.  I then used the VersaFine Acorn ink to do the heat resist technique for the background.  I wiped the background with a dry cloth so the background would stand out.


5.  After I blended the background with the VersaFine Acorn ink, I sprayed the background with Fireworks Desert Sand spray,


6.  I stamped the image, from the stamp set "The Potter", used my scan and cut to cut it out and colored it with copics, and added it to my card, using foam tape,
7.  I stamped the sentiment from the Joy Clair stamp set "The Potter" with VersaFine Nocturne (black), die cut it with a circle die and then added it to my card.

If you have not joined the Joy Clair Challenge this month. The theme is always anything goes but our Design Team uses a photo inspiration to create their project that you can use too. If you would like to join the challenge, you can find all the details here.  One lucky winner will have a chance to win a $25 Gift Certificate to the Joy Clair Store.

I hope you enjoyed my card as much as I enjoyed making it!  Please follow Joy Clair's facebook pageColor by Faith Bible Journaling facebook pageInstagram and Twitter, be the first to hear the news, sales and giveaways! They also have a Pinterest page and Youtube channel for your inspiration!

Supplies Used:


Rinea - Congrats!

Hello everyone!

I am back with Rinea, to share with you a graduation card. It's the time of year that everyone knows someone graduating, so I hope I will inspire you to make a special person to you a graduation card. I am featuring masculine cards, but I think this card could go either way. I just love the rich colors of the gold and red foil papers from the Magical Variety Pack, it goes so well together. I can just image beautiful Christmas cards using this pack! I think the possibilities are endless.

Another view of the card.


Here is how I made my card:

I used an SVG file using my Silhouette to die cut the base of the card and all the elements using Rinea foiled paper from the Magical Variety Pack,


I then used adhesive to add all the elements to the base of the card,


I made the tassel out of twine from my stash attached it with a large brad from my stash,

I stamped the sentiment, die cut it, and added it to my card.

I think my card is clean and simple, but any graduate I hope will love to receive it! This Magical Variety Pack is perfect for any occasion, please stop by Rinea blog to see all the wonderful creations created by the design team!

Thanks for stopping by, please come back again soon.

Supplies Used:

Tuesday, June 19, 2018

Retro Rubber Challenge Blog #89 - Tic Tac Toe


Hello everyone!

I am here with Retro Rubber Challenge blog and we have a new challenge, which isa fun tic tac toe created by design team member Jan Clothier!

If you have not joined our challenges before, the rules are very simple, just use a stamp older than a year and you must include the age (or approximate age) of the stamp in your blog post. Here is the sketch for you to use. I cannot wait to see you take on it.

No automatic alt text available.

My tic tac toe card is embossing, pattern paper and baby.  This cute clean and simple card is perfect for a baby shower card or just to send someone a congratulations.  The baby feet image is from a stamp set by Kaisercraft called Pitter Patter.  It has some cute images that are perfect for baby cards or shower invitations.  This stamp set was released in July 2014.  

My card measures 4 1/4 x 4 1/4, I die cut the pattern paper and adhered it to my card.  I then stamped the image with black versafine ink and then used versamark and embossed it with clear embossing powered.  I die cut the image out with a square stitched frame.  I popped the image up with foam tape.  I stamped the congratulations from a Reverse Confetti stamp set called Fancy Word Coordinates which was released in April 2015.  


closer look so you can see the embossing


Are you ready to play along? Be sure to stop over on the Retro Rubber Challenge blog to get some more inspiration, the design team has some wonderful creations! Thank you for stopping by, you have until June 29th to join the fun!

Supplies Used:

Sunday, June 17, 2018

World's Best Dad!

Hello everyone!

I am stopping in to wish all you father's out there Happy Father's Day!  And to those that had to be both Father and Mother Happy Father's Day to you too!  I have a quick card and a project that I have  to share today.

The first one is a card I made using the Silhouette free image of the month.  It is a print and cut, if you have not gotten it, head over to Silhouette store and get it.

Here is my card:

My card is an A2 card, I printed the image on white 80 lbs card stock, I cut two layers to go onto the card base, I cut a circle with vellum and added it to the card so the coffee cup would stand out against the plaid card stock.  I finished it off by adding some enamel hearts.


My second project is a glass coffee mug that I bought from Target, I found this saying in the Silhouette store and it was perfect for the grandchildren to give to their papa.  


Thanks for stopping by, please come back again!


Tuesday, June 12, 2018

Gina K. Designs Foil-Mates Summer 2018 Release

Hello everyone!

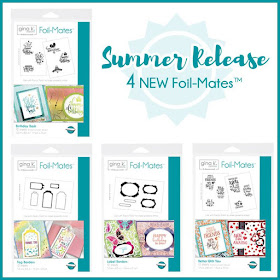
I am here with Gina K. Designs showcasing  Thermoweb Foil-Mates™ Collections.  There are four new Foil-Mates™  that will go great with the collection you may already have!!! 


All of the new Foil-Mates™ are available NOW in the Gina K. Designs store under the tab "What's New". We hope to inspire you with some beautiful projects as you hop along to each of the designer’s blogs!

The best part of the hop is you have a chance to win a $50 gift card for the Gina K. store, oh did I mention there will be 3 $50 gift cards to three lucky winners? All you have to do is visit and comment on each designers blog post. The blog list is below and you will find all the products I used at the bottom too. Have fun!

My first card is from the Gina K. Designs Foil-Mates™ Label Borders.  These borders go with the Gina K. Designs Decorative Label Dies.  These are perfect borders for any project you may want to use them on.  

 
My card, I embossed the first layer, I die cut the label out with the Gina K. Designs Decorative Label Die, I foiled it with Gina K. Designs Fancy  Foil™ Turquoise Sea.  The butterfly and sentiment are from the Stamp n Foil™ Collection.


Here is a closer look, isn't that foil beautiful!


My second project, I am using the Gina K. Designs Tag Borders.  I used the two larger tags which I die cut with the Gina K. Designs Decorative Tag Dies.  I love these tags, they are so versatile.  I am sharing a baby tag, birthday tag and a to, from tag.  Are you wondering where that cute little elephant came from?  All the supplies I used are below, this stamp set is Gina K. Designs illustrated by Beth Silaika.  The birthday present and sentiment are from the Stamp n Foil™ Collection.

My next card is from the Gina K. Designs Foil-Mates™ Better With You.  The sentiments in this set are great ones for your best friend!  


For this card, I used toner sheet and left over foil pieces from the Foil Mates™ Ornamental Holiday I used on another project.  Don't ever throw your pieces away, you can always save them for another project.  I foiled the sentiment and the background toner sheet with Fancy Foil™ Radiant Red.  The hearts are from the Gina K. Designs Double Stitched Ovals Dies.  I used toner paper and foiled it with Radiant Red and die cut them out.  


Here is a closer view of the foiled card.  


Here is another card I created with the Gina K. Designs Foil-Mates™ Better With You.  I could not do a post with Gina K. Designs and not use the Wreath Builder stencil!  The sentiment is from the Gina K. Designs Foil-Mates™ Better With You, I foiled the sentiment with Fancy Foils™ Dazzling Orange.  

Foil-Mates™ 

Closer look at the foiled sentiment.


My next card is made with the Foil-Mates™ Birthday Bash.  Love this set too!  You can make many cards out of these Foil Mates™. 

The background stars are from the Foil-Mates™ Stars and Stripes, I foiled the sentiment with Fancy Foils Twinkling Pink.  I die cut the sentiment with Gina K. Designs Double Stitched Ovals Dies.


Closer look at the foiling on my card.


My last card is also from the Foil-Mates™ Birthday Bash. I foiled this sentiment with  Fancy Foils™
Dazzling Orange. The side layer is from the Gina K. Designs Foil-Mates™ Backgrounds Bold Backdrops that I foiled with Gina K. Designs Fancy Foils™  Brilliant Blue.


Here is  closer look at the foil.  


Supplies Used
:
Below are the products I used to create my card. Click on the link to go directly to the product. Where available I have used compensated affiliate links which means if you make a purchase I will receive a small commission at no extra cost to you. Thank you so much for your support!


Thank you so much for stopping by, enjoy all the fabulous inspiration as you hop and make sure to comment on each blog for a chance to win. Again, there will be 3 $50 gift certificates chosen from all the comments on all the design team blogs.. The winners will be announced on Gina K. Designs blog here on Thursday, June 14th in the morning.

Donna Idlet - YOU ARE HERE!

Joy Clair - Manna from Heaven

Hello everyone!

I am here with Joy Clair with another card using Imagine's products!  We are collaborating all month with Imagine, I hope you have been inspired this far.  I am featuring the Joy Clair stamp set from the Bible Journaling line called "Manna from Heaven" and the Joy Clair background stamp "Crackle".   

Here is my card:


Closer look of the card.


 Here is how I made my card:

1.  My card is an A2 card, 4 1/4 x 5 1/2,
2.  I created the next layer using Fireworks from Imagine, the colors I used are Desert Sand, Rich Cocoa and Pear Tart.  To look at the color of the background, you would never have thought I used these colors.  It's looks like a kraft/goldish color background.  I love the shimmer the fireworks give.


2.  I stamped the Joy Clair Crackle background stamp using my Misti to get a nice clear image using the Versafine Acorn ink,
3.  I then die cut the layer which measuring 4 x 5 1/4,


4.  I stamped the sentiment from the Joy Clair stamp set "Manna from Heaven" and die cut the sentiment so it could be the vocal point of the card,
5.  I stamped the bread from the Joy Clair Manna from Heaven set, colored it with copics and used foam tape to add it to the card.

If you have not joined the Joy Clair Challenge this month. The theme is always anything goes but our Design Team uses a photo inspiration to create their project that you can use too. If you would like to join the challenge, you can find all the details here.  One lucky winner will have a chance to win a $25 Gift Certificate to the Joy Clair Store.

I hope you enjoyed my card as much as I enjoyed making it!  Please follow Joy Clair's facebook pageColor by Faith Bible Journaling facebook pageInstagram and Twitter, be the first to hear the news, sales and giveaways! They also have a Pinterest page and Youtube channel for your inspiration!

Supplies Used:

Tuesday, June 5, 2018

Retro Rubber Challenge Blog #88 - Anything Goes

Hello everyone,

I am here with Retro Rubber Challenge blog and we have a new challenge, which is "Anything Goes"!  I love challenges with anything goes, because you can create anything you would like!  

If you have not joined our challenges before, the rules are very simple, just use a stamp older than a year and you must include the age (or approximate age) of the stamp in your blog post. Here is the sketch for you to use. I cannot wait to see you take on it.


Here is my card, I love how this turned out.  This stamp set is made by Stampingbella and the name of the stamp set is Mason Jar of Flowers, it was released in February of 2017.  

I stamped the image twice, I colored it with copics and then cut a few of the flowers out and popped them up on the card.  I added some glossy accents at the bottom of the jar to make it look like there is water in the jar.  I finished the card off by adding the sentiment from the same stamp set.  


Are you ready to play along? Be sure to stop over on the Retro Rubber Challenge blog to get more inspiration, the design team has some wonderful creations! Thank you for stopping by, you have until June 15th to join the fun!

Monday, June 4, 2018

Rinea - Happy Father's Day!

Hello everyone!

This is my first post as a Design Team Member with Rinea!!! I am very excited for this opportunity and I hope that I will inspire you in your crafting endeavors. I am also excited about the opportunity to share with all of you the foiled papers Rinea has! The foils will make any project you create elegant and will make your projects shine (haha)! I have so many projects in my head I want to create, so I am excited about this year on the design team!

I am sharing with you today a "Father's Day" card! I am using the Rinea Foiled Paper from the newly released set called Magical Variety Pack . My card is clean and simple, but I think elegant at the same time! The foiled papers are perfect for any masculine card.

The base of my card is an A2 card, 4 1/4x 5 1/2, the foiled paper from the Magical Variety Pack measures 4 x 5 1/4.


I die cut all the elements using the Rinea foiled paper from the Magical Variety Pack. I arranged the elements on my card. I used adhesive to adhere the gold pocket, then I used foam tape to add the tie and the word dad. I heat embossed the sentiment with white embossing powder on black card stock and added foam tape and popped it up on my card.


Here is a closer look at the elements I added to my card. 


Thank you so much for stopping by, please come back again!


Supplies Used:


Friday, June 1, 2018

Coffee Lover's Blog Hop - Day 8!

29541159_10216244462694822_8004581139974979584_n
Hello everyone!

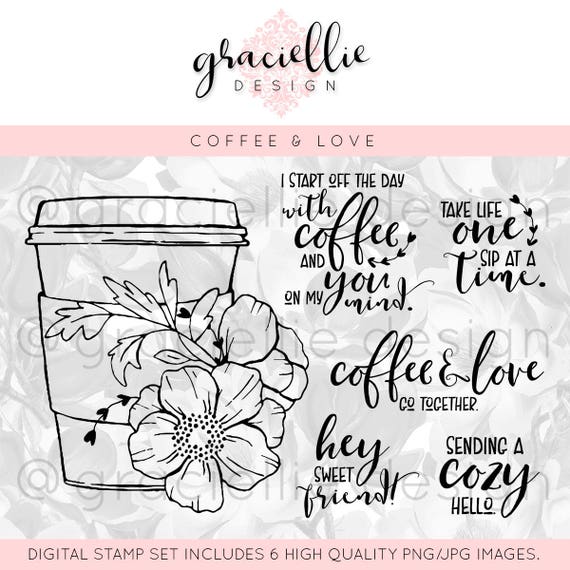
This is the last day of the Spring/Summer Coffee Lover's Blog Hop.  I could not pass downloading the digital file from Graciellie Design.  She has some beautiful detailed digital images, I had to download a couple of them.  For more images or this image check out her Etsy shop!


Here is my card and how I made it:

I downloaded the images, and resized the cup to what I wanted to use on my card, I then printed it on my inkjet printer and cut it out using my brother scan and cut, I then colored it with copics, I printed the sentiment on 80 lbs card stock and die cut the image out, I added the cup to the card using foam tape and added some black enamel dots to finish off the card.


Thank you again for stopping by everyday to check out my cards for the hop.  I have so enjoyed creating all my coffee cards!  I can't wait until the next hop.


JOY CLAIR JUNE CHALLENGE - ANYTHING GOES

Hello everyone!

I am here with Joy Clair and we have a new challenge this month!  As always it is "anything goes" but the design team has a photo inspiration.  I hope you will join, the challenge runs all month and one person has the opportunity to win a $25 gift card to the Joy Clair store.

Here is the inspiration photo:


Here is my take on the challenge:


Closer look at my card


Here is how I put my card together:

1.  My card is an A2 size,
2.  The next layer is 4 x 5 1/4,
3.  I then used my Imagine Versafine Inks to create my scene for the card,


4.  I then stamped my image from the Joy Clair Light House stamp set and colored them with copics,
5.  I then stamped the sentiment from the Joy Clair Light House stamp set  and the birds from the Joy Clair Noah's Ark stamp wet with with VersaFine Noctrine ink,
6.  I added the light house to my card using foam tape to pop it up,
7.  I finished the card off by spraying some Imagine Crafts Sheer Shimmer Spritz Spray, Sparkle, to give make the water sparkle.      

For more inspiration make sure to follow Joy Clair on their social media platforms: Joy Clair blog, facebook page, Joy Clair Stamp Projects, Color By Faith Facebook Group, Instagram and Twitter, Pinterest and Youtube channel to be the first to hear the news, sales and giveaways!

Thank you for stopping by and please join the challenge!

Supplies Used: